Simple Plazzo Making
Palazzos are wide-legged trousers that have gained popularity for their comfort and versatility in contemporary fashion. They can be styled in various ways, offering both elegance and ease of movement. Learning to make simple palazzos involves understanding basic sewing techniques, fabric choices, and measurements. This class note aims to provide a comprehensive guide to the process of making simple palazzos, suitable for beginners and sewing enthusiasts.
Materials Required
Before starting the project, gather the following materials:
- Fabric: Choose fabric suitable for palazzos such as cotton, linen, rayon, or crepe, depending on the desired drape and comfort.
- Pattern: A simple palazzo pattern or measurements to draft one.
- Measuring Tools: Measuring tape, ruler, and marking tools like chalk or fabric marker.
- Cutting Tools: Scissors, pins, and a tracing wheel if using patterns.
- Sewing Supplies: Matching thread, sewing machine (or needle and hand-sewing supplies), iron, and elastic (optional, for waistband).
- Embellishments (optional): Buttons, zippers, laces, etc., depending on the design.
Steps for Making Simple Palazzos
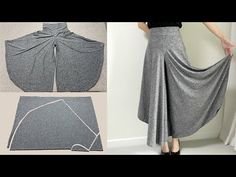
1. Taking Measurements
- Body Measurements: Measure waist, hips, and inseam length. These measurements will determine the size and fit of the palazzos.
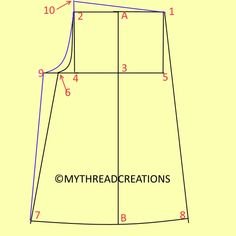
- Drafting the Pattern: Use standard measurements or a commercial pattern to draft the palazzo pieces on paper or directly onto the fabric.
2. Cutting the Fabric
- Preparing the Fabric: Wash, dry, and iron the fabric before cutting to prevent shrinkage later.
- Laying Out the Pattern: Pin or weigh down the pattern pieces on the fabric according to the grain line (parallel to the selvage).
- Cutting: Use sharp scissors to cut out the fabric pieces, ensuring precision along the edges.
3. Stitching Process

- Assembling the Legs: Pin and stitch the inner leg seams (crotch seam) of the palazzos.
- Creating the Waistband: Fold and stitch the top edge of the palazzos to create a casing for elastic (if using). Leave an opening to insert the elastic.
- Inserting Elastic: Measure and cut elastic to fit your waist measurement comfortably. Use a safety pin or elastic threader to guide the elastic through the casing. Secure the ends of the elastic together with a few stitches and close the opening in the casing.
- Hemming: Hem the bottom of the palazzo legs to the desired length.
- Finishing Touches: Trim loose threads and ensure all seams are securely stitched.
4. Variations and Customizations
- Length and Width: Experiment with different lengths of palazzos—from ankle-length to floor-length—and adjust the width of the legs for a more tailored or flowing look.
- Fabric Choices: Try different fabrics to achieve different effects—lightweight fabrics for a flowy feel or heavier fabrics for a more structured look.
- Embellishments: Add embellishments such as pockets, embroidery, or contrasting trims to personalize your palazzos.
5. Troubleshooting Tips
- Fit Adjustments: If the palazzos are too loose or too tight, adjust the seams accordingly.
- Hemming Issues: Ensure the hem is even and straight by measuring carefully before stitching.
Conclusion
Making simple palazzos is a rewarding project that enhances your sewing skills while creating a stylish and comfortable garment. With practice, you can customize palazzos to suit your personal style and preferences. Whether you wear them casually or for more formal occasions, palazzos offer a versatile addition to any wardrobe. By following these steps and experimenting with variations, you can create palazzos that are both flattering and comfortable, reflecting your individual creativity in fashion design.
