Running Stitch on a Suit
In this class, we will delve into the art of running stitch, a fundamental hand sewing technique used in creating various embellishments and seams on suits and other garments. Running stitch is versatile, simple to learn, and forms the basis for more intricate embroidery techniques. Throughout this session, we will explore its application specifically on suits, enhancing their aesthetic appeal and structural integrity.
Materials Needed:
- Fabric: Choose a suitable fabric for your suit project, such as cotton, linen, wool, or blends depending on the desired look and functionality.
- Embroidery Thread: Select threads that complement your fabric and design. Embroidery threads come in various materials like cotton, silk, or synthetic fibers, offering flexibility in color and texture.
- Embroidery Hoop: Optional but useful for stabilizing the fabric and maintaining tension while stitching.
- Needles: Embroidery or sewing needles suitable for the thread and fabric weight.
- Scissors: Sharp scissors for cutting threads and trimming excess fabric.
- Marking Tools: Fabric chalk, water-soluble pens, or tailor’s chalk for marking design lines on the fabric.
- Thimble: Optional but recommended for protecting your fingers during extensive stitching.
Understanding Running Stitch:
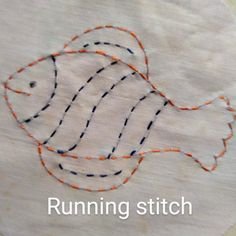
1. Basics of Running Stitch:
- Definition: Running stitch is a basic sewing stitch where the needle and thread run in and out of the fabric in a straight or slightly curved line.
- Purpose: It is used for both functional and decorative purposes, such as seams, quilting, basting, and embroidery.
2. Types of Running Stitch:
- Basic Running Stitch: A simple up-and-down stitch used for joining fabric pieces or basic outlines.
- Backstitch: A variation where each stitch overlaps with the previous one, creating a stronger seam or outline.
- Double Running Stitch: Also known as Holbein stitch, involves stitching a line of running stitch and then returning over it in the opposite direction, creating a reversible pattern.
3. Preparation and Setup:
- Marking the Design: Use fabric chalk or a water-soluble pen to outline the design or seam lines on the suit fabric.
- Thread Preparation: Separate and thread your needle with an appropriate length of embroidery thread, knotting one end securely.
Applying Running Stitch on a Suit:
1. Seams and Construction:
- Joining Fabric Panels: Use running stitch to sew together panels of the suit, ensuring neat and strong seams.
- Flat-Felled Seams: Create a flat-felled seam by folding one seam allowance under and stitching it down with running stitch to encase the raw edge.
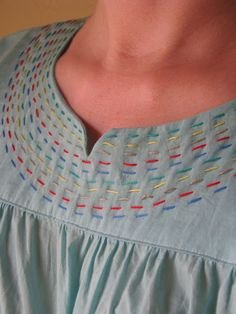
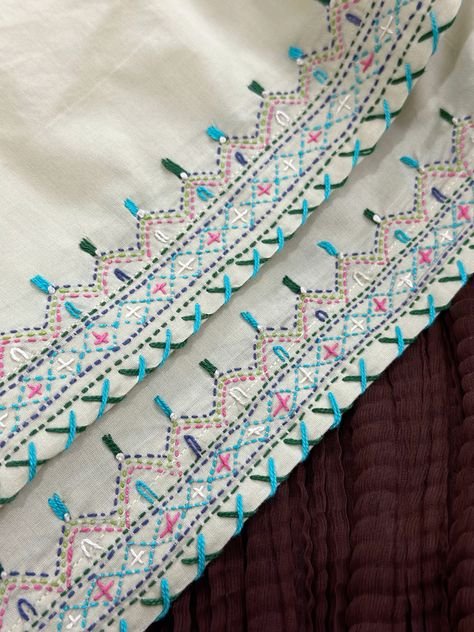
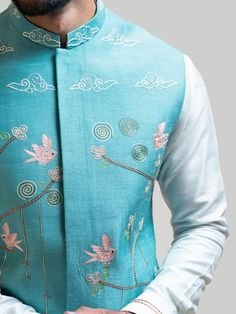
2. Decorative Embellishments:
- Outline Embroidery: Use running stitch to outline patterns, motifs, or borders on the suit fabric.
- Adding Detail: Enhance collars, cuffs, pockets, and hems with running stitch for a subtle yet sophisticated look.
- Pattern Creation: Experiment with different stitch lengths and spacings to create texture and visual interest.
3. Techniques for Success:
- Consistency: Maintain consistent stitch length and tension throughout your stitching for a professional finish.
- Securing Ends: Knot or backstitch at the beginning and end of each line of running stitch to secure the thread.
- Handling Curves: Ease fabric around curves by adjusting the stitch length or using smaller stitches.
Practical Session: Creating Running Stitch Embellishments
1. Preparing the Fabric:
- Selecting Design: Choose a simple motif or border design to practice running stitch.
- Transferring Design: Transfer the design onto the fabric using a tracing method or embroidery transfer paper.
2. Executing Running Stitch:
- Starting: Begin stitching from the wrong side of the fabric to hide the knot.
- Stitching Technique: Insert the needle from the back to the front of the fabric, evenly spacing stitches along the marked design lines.
- Progression: Continue stitching, following the design outline or seam lines with precision.
3. Finishing Touches:
- Completing the Design: Stitch until the entire design or seam line is covered with running stitch.
- Securing Threads: Knot the thread securely on the wrong side of the fabric and trim excess thread close to the knot.
- Pressing: Gently press the embroidered area on the wrong side of the fabric using a pressing cloth to flatten any puckering.
Advanced Techniques and Variations:
1. Layered Effects:
- Contrasting Threads: Experiment with contrasting thread colors or metallic threads to create a striking effect.
- Layering Stitches: Combine running stitch with other embroidery stitches like satin stitch or chain stitch for dimension and texture.
2. Incorporating Beads and Sequins:
- Adding Embellishments: Use running stitch as a base to attach beads, sequins, or small embellishments for added sparkle and detail.
3. Personalizing Designs:
- Customization: Tailor running stitch designs to suit individual preferences, incorporating cultural motifs or personal symbolism.
Conclusion:
Running stitch is a versatile and foundational technique in garment construction and embroidery. Its simplicity and adaptability make it accessible to beginners while offering endless creative possibilities for advanced practitioners. By mastering running stitch, you can elevate the aesthetics and durability of suits and other garments, adding unique handmade elements that reflect personal style and creativity.
