Flat Stitch
Welcome to today’s class on mastering the flat stitch—a fundamental embroidery technique that offers versatility in creating precise outlines, filling shapes, and adding intricate details to fabric. In this session, we will explore the origins, characteristics, applications, and practical exercises to help you develop proficiency in flat stitch embroidery, enhancing your skills in textile arts.
Materials Needed:
- Fabric: Choose a suitable fabric for practicing embroidery, such as cotton, linen, or even canvas, depending on the desired project and stitch density.
- Embroidery Threads: Select threads in various colors and textures, including embroidery floss or stranded cotton, to achieve desired effects.
- Needles: Embroidery needles in sizes suitable for your thread and fabric.
- Embroidery Hoop: Optional but recommended for stabilizing the fabric and maintaining tension while stitching.
- Scissors: Sharp scissors for cutting threads and trimming excess fabric.
- Marking Tools: Fabric chalk, water-soluble pens, or tailor’s chalk for transferring designs onto the fabric.
- Reference Materials: Patterns, design templates, or sketches to guide your embroidery work.
Understanding Flat Stitch:
1. Definition and Characteristics:
- Flat Stitch: A basic embroidery stitch where each stitch lies flat on the surface of the fabric, creating a smooth and even appearance.
- Versatility: Used for outlining shapes, filling areas with solid color, and adding fine details to embroidery designs.
2. Types of Flat Stitch:
- Straight Stitch: The most basic form of flat stitch, involving single straight stitches placed closely together to form lines or shapes.
- Satin Stitch: A variation where longer straight stitches are used to completely fill shapes, creating a smooth, satin-like surface.
3. Key Features:
- Precision: Ideal for creating precise lines, curves, and intricate details in embroidery.
- Texture Control: Can be used to achieve both smooth surfaces and textured effects depending on thread density and stitch direction.
Practical Session: Learning Flat Stitch
1. Setting Up:
- Fabric Preparation: Cut a piece of fabric and secure it in an embroidery hoop to maintain tension.
- Thread Selection: Choose an embroidery thread color that contrasts or complements your fabric for clear visibility and aesthetic appeal.
2. Executing Flat Stitch:
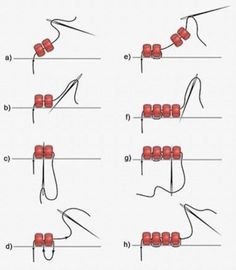
- Starting Point: Bring the needle up through the fabric at the starting point of your design or outline.
- Stitching Technique: Insert the needle back into the fabric at a point slightly ahead of the starting point, creating a single straight stitch.
- Continuation: Repeat the process, keeping stitches uniform in length and spacing to maintain consistency.
- Completing the Line: Continue stitching along the design outline or within the filled area until the shape is covered or outlined.
3. Variations and Design Flexibility:
- Stitch Length and Density: Vary stitch length and density to create different effects, from fine lines to solid fills.
- Directional Stitching: Experiment with stitching direction (vertical, horizontal, diagonal) to enhance texture and visual interest.
Applications of Flat Stitch:
1. Outlining and Detailing:
- Outline Embroidery: Use flat stitch to outline shapes, motifs, and lettering for clarity and definition.
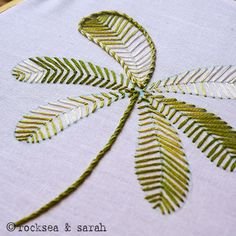
- Adding Details: Enhance embroidery designs with intricate details such as veins in leaves, petals on flowers, or architectural elements.
2. Filling Shapes:
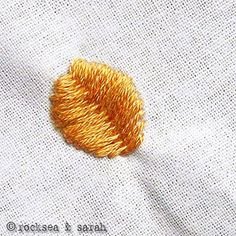
- Solid Fills: Employ satin stitch (a form of flat stitch) to fill larger areas with solid color, creating a smooth and polished surface.
- Textured Fills: Combine straight stitches at varying angles or densities to create textured fills that mimic shading or stippling effects.
Practical Exercise: Creating Flat Stitch Designs
Materials Needed:
- Fabric squares or strips
- Thread and needle
- Embroidery hoop (optional)
- Scissors
Instructions:
- Step 1: Cut fabric squares or strips approximately 6 inches long and 4 inches wide.
- Step 2: Mark a simple geometric shape (e.g., square, circle) or outline design using fabric chalk or a water-soluble pen.
- Step 3: Thread your needle with a contrasting thread color and knot one end securely.
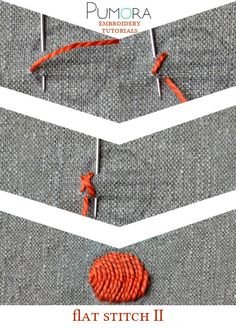
- Step 4: Begin stitching from one end of the marked line using flat stitch (straight stitch or satin stitch).
- Step 5: Continue stitching until the shape is outlined or filled, adjusting stitch length and spacing as needed for desired effect.
- Step 6: Knot and secure the thread on the wrong side of the fabric once you have completed the stitching.
Tips for Success:
- Practice controlling stitch length and maintaining even tension for a neat and professional finish.
- Experiment with different thread colors, textures, and stitch directions to explore the creative potential of flat stitch.
- Gradually increase the complexity of your practice exercises by incorporating more intricate designs and combinations of stitches.
Advanced Techniques and Variations:
1. Layering and Blending:
- Color Blending: Blend different shades of thread within the same design using flat stitch to create gradual color transitions.
- Layering Stitches: Layer flat stitches of varying lengths or densities to achieve depth and dimension in embroidery designs.
2. Combination with Other Stitches:
- Mixed Media: Combine flat stitch with other embroidery stitches such as chain stitch, French knots, or couching to add variety and texture.
3. Design Considerations:
- Scale and Proportion: Consider the scale of your embroidery design in relation to the fabric and intended use to ensure clarity and impact.
- Personalization: Customize flat stitch designs with personal motifs, initials, or thematic elements to create unique and meaningful embroidered pieces.
Conclusion:
Flat stitch is a foundational embroidery technique valued for its precision, versatility, and ability to enhance textile art with detailed and refined embellishments. By mastering flat stitch, you gain essential skills to create sophisticated embroidery designs that showcase craftsmanship and creativity. Through practice and exploration of design possibilities, you can develop your own style and contribute to the rich tradition of decorative needlework.
