A Line Frock
The A-line frock is a classic and versatile garment characterized by its fitted bodice that gradually flares out from the waist or underarm area to create an “A” shape silhouette. In this class, we will explore the art of making an A-line frock, covering essential topics such as design considerations, fabric selection, pattern drafting, cutting techniques, sewing methods, fitting adjustments, and finishing touches. By mastering these skills, you will be able to create A-line frocks tailored to various occasions, from casual everyday wear to more formal settings.
1. Introduction to A-Line Frock
Overview:
- Definition: An A-line frock is a dress with a silhouette that resembles the letter “A,” fitted at the shoulders and gradually widening towards the hem.
- Versatility: Suitable for a wide range of body types and occasions, from casual outings to semi-formal events.
- Features: Typically features a simple bodice, defined waistline (or high-waisted), and a skirt that flares gently without excessive volume.
2. Design Considerations

A. Silhouette
1. A-Line Shape:
- The skirt of an A-line frock flares out gradually from the waist or underarm area, creating a streamlined and flattering silhouette.
- Suitable for all body types as it skims over the hips and thighs without clinging.
B. Neckline and Sleeve Options
1. Necklines:
- Round Neck: Simple and classic, suitable for everyday wear.
- V-Neck: Flattering and elongating, often chosen for more formal or elegant frocks.
- Square Neck: Offers a structured and modern look, ideal for tailored designs.
- Boat Neck: Wide and slightly curved, adds a touch of sophistication to the neckline.
2. Sleeves:
- Sleeveless: Enhances mobility and comfort, perfect for warm weather or layering.
- Short Sleeves: Versatile and practical, suitable for casual or office wear.
- Cap Sleeves: Delicate and feminine, adding a touch of charm to the frock’s design.
- Three-quarter Sleeves: Offers coverage while maintaining elegance, suitable for transitional seasons.
3. Fabric Selection
A. Types of Fabrics
1. Lightweight Fabrics:
- Cotton: Breathable and comfortable, suitable for casual and summer A-line frocks.
- Linen: Offers a natural texture and cooling effect, ideal for warm-weather frocks.
- Chiffon: Sheer and flowing, perfect for creating an ethereal and elegant look.
- Silk: Luxurious and smooth, adds a touch of sophistication to formal A-line frocks.
B. Medium to Heavyweight Fabrics
1. Wool: Provides warmth and structure, suitable for winter or cooler weather A-line frocks.
- Crepe: Offers a subtle texture and drape, ideal for tailored or semi-formal A-line frocks.
- Brocade: Richly textured with intricate patterns, perfect for special occasion A-line frocks.
- Velvet: Soft and plush, adds a luxurious feel to evening or winter A-line frocks.
C. Print and Pattern
1. Solid Colors: Classic and versatile, allowing the focus to be on the A-line silhouette and design details.
- Prints: Floral, geometric, or abstract prints can add interest and personality to the A-line frock.
- Embroidery: Intricate stitching or appliqué can embellish the fabric, enhancing the frock’s visual appeal.
- Stripes or Checks: Create visual interest and play with directional patterns in the A-line frock’s design.
4. Pattern Drafting and Cutting
A. Using Commercial Patterns
1. Choosing a Pattern:
- Select an A-line frock pattern from a sewing pattern company, considering the desired neckline, sleeve options, and skirt length.
- Ensure the pattern includes instructions for fitting adjustments and finishing details.
B. Drafting Your Own Pattern
1. Taking Measurements:
- Measure bust, waist, and hip circumferences, as well as desired frock length from shoulder to hem.
- Record these measurements accurately to draft a pattern that fits well.
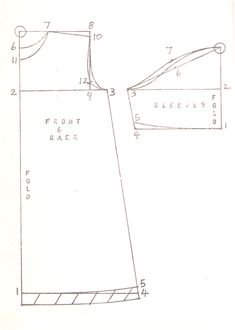
2. Drafting Steps:
- Use pattern drafting tools or a basic block pattern to draft front and back bodice pieces, skirt pieces, and sleeve pieces if applicable.
- Add seam allowances (typically ⅜ inch or 1 cm) to all edges for sewing.
- Create a mock-up (muslin toile) to test the fit before cutting into the final fabric.
5. Cutting Techniques
A. Fabric Preparation
1. Layout:
- Place pattern pieces on the fabric following grain lines and pattern instructions.
- Pin pattern pieces securely to prevent shifting during cutting.
B. Cutting Process
1. Marking:
- Transfer pattern markings (darts, notches, pleats) onto the fabric using fabric marker or chalk.
- Double-check markings for accuracy before cutting.
2. Cutting Tools:
- Use sharp fabric scissors or a rotary cutter and cutting mat to cut out pattern pieces accurately.
- Pay attention to cutting along marked lines and maintaining smooth edges.
6. Sewing Techniques
A. Seam Construction
1. Seam Allowance:
- Use a ⅜ inch (1 cm) seam allowance unless otherwise specified in the pattern instructions.
- Finish seam allowances with a zigzag stitch, serger, or by pressing open for a neat interior finish.
B. Assembly Steps
1. Constructing the Bodice:
- Sew front and back bodice pieces together at shoulder and side seams, matching raw edges.
- Press seams open or towards the back for a professional finish.
2. Attaching Sleeves (if applicable):
- Set in sleeves by easing them into the armholes, ensuring smooth transitions and even gathers if required.
- Finish sleeve seams and press for a clean appearance.
3. Adding Skirt Panels:
- Attach skirt panels to the bodice, aligning waistlines and matching seam intersections.
- Gather or pleat skirt fabric as needed to achieve desired fullness and fit.
4. Hemming and Finishing
1. Hem Finish:
- Finish the bottom edge of the frock with a narrow hem using a straight stitch or blind hem stitch.
- Press the hem to ensure it hangs evenly and maintains the frock’s desired length.
7. Fitting Adjustments
A. Fitting Techniques
1. Fitting the Bodice:
- Make fitting adjustments to the bodice by taking in or letting out seams as needed for a comfortable fit.
- Use fitting pins or baste stitches to temporarily adjust fit before permanent stitching.
B. Altering Length
1. Hemming:
- Measure and mark the desired frock length, allowing for hem allowance.
- Sew a narrow hem using a straight stitch or blind hem stitch for a clean finish.
8. Embellishments and Decorative Details
A. Adding Embellishments
1. Lace or Trim:
- Attach lace or trim along neckline, sleeves, or hemline to enhance the frock’s design.
- Choose complementary colors and textures to create a cohesive look.
B. Appliqué or Embroidery
1. Decorative Elements:
- Apply appliqué or embroidery to bodice or skirt panels for a personalized touch.
- Use contrasting threads or beads to create intricate designs and patterns.
9. Styling Tips
A. Casual Wear
1. Daytime Frock: Pair with flats or sandals for a relaxed and comfortable outfit.
- Denim Jacket: Layer with a denim jacket for a casual and stylish ensemble.
B. Formal Wear
1. Evening Frock: Style with heels and statement jewelry for a sophisticated look.
- Clutch Bag: Complete the outfit with a clutch bag for practical elegance.
C. Special Occasions
1. Party Frock: Choose vibrant colors or prints and accessorize with bold jewelry for festive occasions.
- Hair Accessories: Enhance the outfit with hair accessories such as headbands or clips for added flair.
10. Care and Maintenance
A. Washing Instructions
1. Fabric Care:
- Follow fabric care instructions provided on the fabric bolt or pattern envelope to maintain fabric quality and color.
- Machine wash or hand wash frocks according to fabric type and construction details.
B. Storage
1. Hanging or Folding:
- Hang frocks on padded hangers to maintain their shape and prevent creasing.
- Fold frocks neatly and store in a cool, dry place away from direct sunlight to preserve fabric integrity.
11. Troubleshooting and Tips for Success
A. Common Issues
1. Fit Issues:
- Check the fit of the frock during the sewing process and make adjustments promptly to avoid fit issues.
- Use a fitting buddy or dress form to assess fit and make alterations as necessary.
B. Tips for Success
1. Practice Techniques:
- Practice sewing basic seams, darts, and hems on scrap fabric before starting on the actual frock.
- Take your time with pattern cutting and sewing to ensure accurate construction and a professional finish.
Conclusion
Mastering the art of making an A-line frock involves understanding design principles, fabric selection, pattern drafting, cutting techniques, sewing methods, fitting adjustments, and finishing details. By following the steps outlined in this class, you can confidently create A-line frocks tailored to your personal style and occasion needs. Whether sewing for everyday wear, special events, or as part of a creative sewing project, the skills acquired through A-line frock making provide a foundation for expressing your creativity and creating garments that fit well and showcase your craftsmanship. Enjoy the process of designing and sewing A-line frocks that flatter and reflect your unique style!
