
Pedicure Steps
Manicure and Pedicure
Most of us head towards a salon when looking to get our manicure and
pedicure done. But when going to a salon is not an option, you can bring
the salon to your home. By following this cheat sheet, you can open your
very own salon at home! Let us tell you
how.
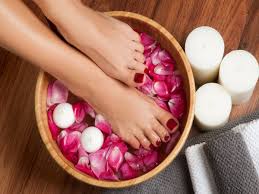
How to Do Pedicure ?
If you are taking care of your fingernails, why leave the poor toenails
out? Try out a simple pedicure at home too and give your feet an
instant makeover.
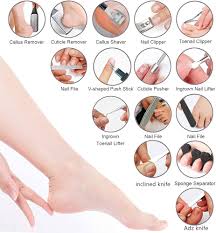
● Prepare ahead: Much like the manicure, for the pedicure
too, you need to prepare beforehand. Get all the things ready so that
you don’t have to get up in the middle and leave your relaxing spot in
the salon at home. You need to arrange the following:
● Nail paint remover and some cotton wool
● A good nail cutter
● A nail file
● Cuticle trimmer
● Foot cream
● Base nail coat
● Nail polish
● Top nail coat
● A bucket or small tub
● Some shampoo or body wash
● A towel
● Wash your feet and nails: Before you begin, wash your feet under running, hot water. This will
help wash away any dirt and help you start the home pedicure process. If there is any visible injury to
your feet, take care by either covering it with a bandage or working around it during the pedicure to
avoid inflammation and spread of infection.
● Cut your nails and remove paint: Cut your toenails neatly and remove any paint that may still
be left on them. If you want to shape your toenails, use a good nail file to do the job. Also cut the loose
ends on the cuticles. Do not however tear or cut deep into the cuticles as that can cause skin infections
later on.
● Soak your feet: Next, we come to the relaxing bit of soaking your feet in warm water. Fill the bucket
or tub with some warm water (as warm as you can tolerate) and add a dash of shampoo or body wash
to it. Soak your feet in the water and leave it for about five minutes. This will open up the pores and also
let the dirt come out from between the toes and nails.
● Exfoliate: This is one of the main components of your pedicure.
After you take your foot out of the warm water, pat dry it with a
towel. Then apply the foot cream and use a pumice stone or a foot
scrubber to scrub your heel and the base of your foot. This will help
eliminate the dead skin cells and clear out the cracks on your foot.
● Rinse: The exfoliation should be followed by a thorough foot wash. Rinse your foot under running
water to clear off all the loose, dead skin and to clear off the foot cream.
● Moisturize: Exfoliation will make your skin dry and may cause redness and irritation. To prevent this,
apply a good, soothing moisturizer. Massage it into the skin of your foot and into the nails and cuticles
as well. Leave it for a while and then take some nail paint remover and clean your toe nails of the
moisturizer. The polish won’t stay on well if there is any grease on the surface of the nail when you apply
it. So make sure you clean your nails and dry them out properly before you apply nail polish on them.

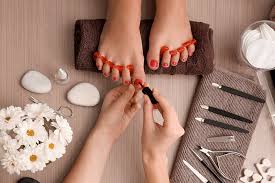
● Paint your nails: Next, you have to put a base coat on the toe nails. This coat helps put a strong
foundation for the nail color. Once the base coat dries up, apply your favorite toe nail paint. Put a
minimum of three layers for a long-lasting effect. Once that dries up, apply a top coat and seal the nail
paint securely.
● Apply another round of foot cream: Since you rubbed
off all the cream from your toes prior to applying the nail paint, you have
to rehydrate your nails. So apply another round of foot cream after the
nail polish has completely dried out. This will give you a fresh feeling
and also keep your feet healthy and moist.
[Also Read: 7 Homemade Pedicure and Foot Care Tips to
Remove Tan]
It is not at all difficult to carry out a manicure and pedicure at home.
Follow this beauty regime and say hello to beautiful, healthy and
nourished hands and feet!
Extra Tips for a Perfect Manicure and Pedicure
- Always use a base coat and top coat. If you want to walk away with a salon quality manicure and
pedicure done at home, you’ll need to stick to these crucial steps to properly protect your nails from
start to finish. - Clean your tools after your last manicure and pedicure. To avoid bacteria build up and infection,
clean your tools after each use. - Moisturize beforehand! Moisturize with a hand lotion or body lotion beforehand so your newly
painted nails can dry safely. - Avoid using Q-Tips to clean nail polish mistakes. Q-Tips aren’t ideal for this detailed procedure.
Instead, opt for a makeup brush dipped in natural nail polish remover to touch up any smudges. - Roll – don’t shake! – your nail polish bottle. This will prevent bubble formation for a smoother
manicure and pedicure. - Do your manicure and pedicure in a cool, dry environment. So your nail polish can thoroughly dry in
between layers. - Use fresh 10-Free nail polish. If your nail polish resembles salt water taffy, it’s time to pick up a fresh
bottle. Been over 12 months? Start fresh with a new 10-Free Nail Polish shade you’ve been eyeing.

