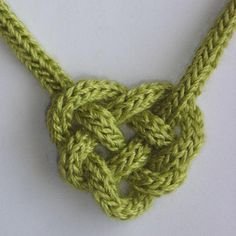
Knot Stitching
Knot stitching, also known as knotted stitches, encompasses a variety of embroidery techniques where the primary element of the stitch is a knot. These knots can vary in size, shape, and complexity, offering versatility in creating textures, patterns, and designs in embroidery. In this class, we will explore several types of knot stitches, their applications, techniques, and tips for incorporating them into your embroidery projects.
1. Introduction to Knot Stitching
Overview: Knot stitching is a fundamental aspect of embroidery, providing texture, dimension, and detail to designs. Knots can be used to depict flowers, create intricate patterns, fill spaces, or add accents to embroidered pieces. They range from simple to complex, allowing artists to achieve various effects depending on the type of knot and its arrangement.
Materials Needed:
- Fabric (e.g., cotton, linen)
- Embroidery hoop
- Embroidery needles (suitable for the thread thickness)
- Embroidery threads (stranded cotton, silk, or specialty threads for specific effects)
- Scissors
- Design or pattern (optional for guidance)
Basic Techniques:
- Hooping: Secure your fabric in an embroidery hoop to maintain tension, which facilitates stitching.
- Needle Selection: Choose needles appropriate for the thread thickness to ensure smooth stitching.
- Thread Preparation: Separate embroidery threads into strands as needed for the desired effect.
2. Types of Knot Stitches
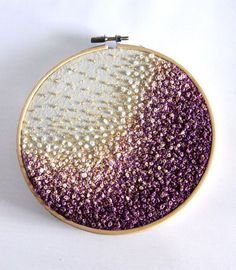
A. French Knot
Overview: The French knot is a classic and versatile knot stitch used to create small, textured dots or clusters in embroidery. It is ideal for adding detail to flower centers, creating eyes on figures, or as decorative elements in various designs.
Technique:
- Starting Point: Bring the needle up through the fabric at the desired location for the knot.
- Thread Wrapping: Hold the working thread taut and wrap it 2-3 times around the needle.
- Forming the Knot: Insert the needle back down through the fabric very close to the starting point, while holding the wraps in place with your thumb.
- Securing: Gently pull the needle through to the back of the fabric, adjusting the tension to control the size of the knot.
Applications:
- Flower Centers: Use French knots to create textured centers for flowers like roses, sunflowers, or daisies.
- Detailing: Add French knots as accents in landscapes, animal fur, or intricate patterns.
Tips:
- Tension Control: Adjust the tension of the thread to control the size and tightness of the knot.
- Placement: Plan the placement of French knots carefully to achieve balanced and harmonious designs.
B. Bullion Knot
Overview: The bullion knot is a longer and more intricate knot stitch that resembles a twisted rope. It is used for creating textured lines, leaves, or as a decorative element in embroidery.
Technique:
- Starting Point: Bring the needle up through the fabric at the beginning of the line or shape to be stitched.
- Thread Wrapping: Hold the thread taut and wrap it around the needle multiple times (more wraps than for a French knot).
- Forming the Knot: While holding the wraps in place with your thumb, insert the needle back down through the fabric close to the starting point.
- Securing: Gently pull the needle through to the back of the fabric, adjusting the tension to form a tight and even bullion knot.
Applications:
- Stems and Branches: Use bullion knots to create textured stems and branches in floral designs.
- Embroidery Details: Add bullion knots as accents in borders, monograms, or as filling stitches.
Tips:
- Practice: Bullion knots require practice to achieve consistency in size and shape.
- Needle Positioning: Experiment with different angles and positions of the needle to control the direction of the bullion knot.
C. Colonial Knot
Overview: The colonial knot is a variation of the French knot, known for its smoother and more uniform appearance. It is slightly easier to control and can be used interchangeably with French knots depending on the desired effect.
Technique:
- Starting Point: Bring the needle up through the fabric at the desired location for the knot.
- Forming the Loop: Without wrapping the thread around the needle, create a loop with the working thread.
- Securing the Knot: Insert the needle back down through the fabric close to the starting point, holding the loop in place.
- Adjustment: Gently tighten the loop to form a small knot on the fabric surface.
Applications:
- Fine Detailing: Use colonial knots for fine detailing in small areas of embroidery.
- Substitution: Substitute colonial knots for French knots in designs where a smoother appearance is desired.
Tips:
- Loop Control: Control the size of the colonial knot by adjusting the size of the initial loop created.
- Consistency: Aim for consistency in tension to maintain uniformity in colonial knots across your embroidery project.
3. Advanced Knot Stitches

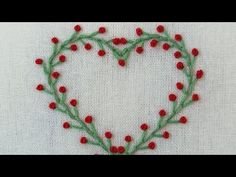
A. Pistil Stitch (Long French Knot)
Overview: The pistil stitch, also known as a long French knot, is a variation that elongates the French knot into a seed-like shape. It is used for creating flower stamens, berries, or other detailed elements in floral designs.
Technique:
- Starting Point: Bring the needle up through the fabric at the desired location for the knot.
- Thread Wrapping: Wrap the thread around the needle several times, similar to a French knot.
- Securing the Knot: Insert the needle back down through the fabric close to the starting point, holding the wraps in place.
- Forming the Seed: Gently pull the needle through to the back of the fabric, adjusting the tension to form a elongated knot.
Applications:
- Floral Details: Use pistil stitches to create realistic flower stamens or as part of intricate floral motifs.
- Variety: Combine pistil stitches with other knot stitches to add depth and detail to embroidery designs.
Tips:
- Thread Control: Use finer threads for delicate pistil stitches and thicker threads for more pronounced knots.
- Placement: Experiment with different arrangements and densities of pistil stitches to achieve desired effects in floral embroidery.
B. Turkey Work (Ghiordes Knot)
Overview: Turkey work, also known as the Ghiordes knot, is a dense and textured knot stitch used to create fluffy or raised effects in embroidery. It is often used for depicting fur, grass, or other textured surfaces.
Technique:
- Starting Point: Bring the needle up through the fabric at the beginning of the area to be filled.
- Thread Wrapping: Wrap the thread around your finger or a tool (like a needle) multiple times to form a thick bundle.
- Securing the Knot: Insert the needle back down through the fabric close to the starting point, holding the wraps in place with your thumb.
- Adjustment: Gently pull the needle through to the back of the fabric, adjusting the tension to form a dense and textured knot.
Applications:
- Texture: Use Turkey work to create textured surfaces in animal fur, grassy fields, or other natural elements.
- Dimension: Combine Turkey work with other stitches to add depth and dimension to embroidery designs.
Tips:
- Practice: Turkey work requires practice to achieve even and consistent knots.
- Thread Thickness: Use thicker threads or multiple strands of embroidery floss for more pronounced Turkey work knots.
4. Incorporating Knot Stitches into Embroidery Designs
Design Considerations:
- Placement: Plan the placement of knot stitches to enhance the overall design and composition of your embroidery.
- Color: Experiment with different thread colors and textures to create contrast, depth, and visual interest.
- Combination: Combine different knot stitches within a single design to achieve varied textures and effects.
Techniques for Integration:
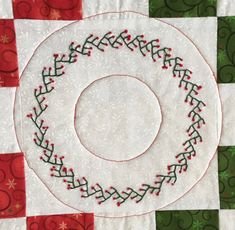
- Outline and Detail: Use knot stitches for outlining shapes and adding fine details to embroidered motifs.
- Filling and Texture: Fill spaces within designs with knot stitches to create textured surfaces or intricate patterns.
- Layering: Layer knot stitches with other embroidery techniques, such as satin stitch or cross stitch, to achieve complex and visually dynamic designs.
Creative Tips:
- Experimentation: Don’t hesitate to experiment with knot stitches to discover unique effects and techniques.
- Reference: Refer to embroidery books, online tutorials, or workshops for inspiration and guidance on using knot stitches in embroidery.
Conclusion
Knot stitching offers a rich and versatile approach to embroidery, allowing artists to create intricate textures, patterns, and designs with knots as the focal element. Whether you’re embellishing flower petals with French knots, adding depth with bullion knots, or creating fluffy textures with Turkey work, mastering these techniques enhances your ability to express creativity and craftsmanship through embroidery. With practice and exploration, you can incorporate knot stitches into your embroidery repertoire, transforming fabric into beautifully textured works of art. Enjoy the journey of knot stitching and the endless possibilities it brings to your embroidery projects!
