How to Stitch a Tree Using Embroidery
Embroidering a tree can be a rewarding and creative endeavor, allowing you to capture the beauty of nature and create textured, lifelike designs on fabric. In this class, we will explore various techniques and stitches to stitch a tree using embroidery, focusing on both realistic and stylized approaches. We’ll cover everything from basic tree anatomy to specific embroidery stitches that mimic bark, leaves, and branches.
1. Understanding Tree Anatomy
Before diving into embroidery techniques, it’s essential to understand the basic anatomy of a tree. This understanding will guide your stitching process and help you create a realistic representation.
Tree Components:
- Trunk: The main vertical stem of the tree, often characterized by texture and bark patterns.
- Branches: Secondary woody stems that extend from the trunk, supporting leaves, flowers, and fruits.
- Leaves: Broad, flat structures attached to branches, crucial for photosynthesis.
- Bark: Outer covering of the trunk and branches, varying in texture and appearance depending on the tree species.
Types of Trees:
- Deciduous Trees: Trees that shed their leaves annually, such as oak, maple, or birch.
- Evergreen Trees: Trees that retain their leaves year-round, like pine, spruce, or cedar.
- Fruit Trees: Trees that bear fruits, such as apple, cherry, or citrus trees.
2. Materials Needed
Materials:
- Fabric (e.g., cotton, linen)
- Embroidery hoop (to hold fabric taut)
- Embroidery needles (suitable for your thread and fabric)
- Embroidery threads (stranded cotton, silk, or specialty threads for texture)
- Scissors
- Pattern or design sketch (optional for guidance)
Choosing Fabric:
- Select a fabric with a tight weave to support detailed stitching.
- Consider the color and texture of the fabric to complement your tree design.
Choosing Threads:
- Use embroidery floss in shades of brown, green, and other colors for leaves and details.
- Variegated threads can add depth and natural variation to your tree.
3. Basic Techniques for Tree Embroidery
A. Trunk and Branches
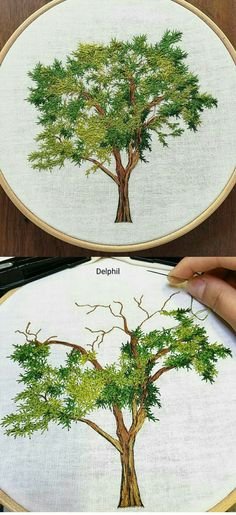
1. Outline Stitch:
- Use a split stitch or back stitch to outline the trunk and major branches.
- Outline stitches provide a clear definition and structure to your tree.
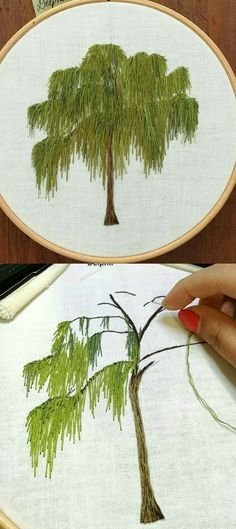
2. Stem Stitch:
- Create texture on the trunk and branches using a stem stitch.
- Vary the thickness of the stitches to mimic the natural ridges and grooves of bark.
3. Long and Short Stitch:
- For larger trees or areas with shading, use long and short stitches to create a shaded effect.
- Gradually blend colors to depict light and shadow on the tree trunk.
B. Bark Texture
1. Satin Stitch:
- Use satin stitch sparingly to highlight smooth areas on the bark or for certain tree species.
- Adjust stitch direction to follow the natural flow of the tree trunk.
2. Seed Stitch:
- Create a textured bark surface with seed stitches.
- Randomly scatter small stitches to mimic the rough texture of bark.
3. French Knots:
- Add small clusters of French knots to create knots and knotholes in the bark.
- Use different shades of brown for depth and realism.
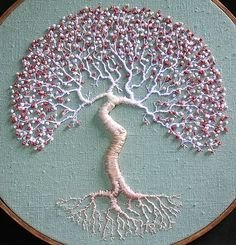
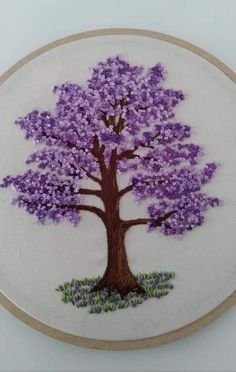
4. Adding Leaves
A. Types of Leaf Stitches
1. Lazy Daisy Stitch:
- Create individual leaves using lazy daisy stitches.
- Vary the length and angle of stitches to emulate different leaf shapes.
2. Fishbone Stitch:
- Use fishbone stitch for larger leaves, creating a central vein and branching outwards.
- Layer stitches to add depth and dimension to the leaves.
3. Detached Chain Stitch (Lazy Daisy):
- Form small leaves using detached chain stitches, ideal for creating delicate foliage.
- Cluster stitches together to form clusters of leaves on branches.
B. Placement and Density
- Place leaves along branches and adjust density based on the tree type (sparse for conifers, dense for deciduous).
- Mix shades of green and add touches of yellow or red for seasonal variation.
5. Advanced Techniques and Details
A. Tree Bark Details
1. Couching:
- Use couching to add thicker threads or yarns as accents on the tree bark.
- Create patterns or highlight areas with contrasting textures.
2. Turkey Work (Ghiordes Knot):
- Achieve a fluffy texture on tree bark or moss using Turkey work knots.
- Experiment with thread lengths and colors for a natural effect.
B. Tree Blossoms or Fruits
- Use French knots or tiny seed stitches to depict blossoms or fruits on fruit trees.
- Choose thread colors that contrast with the leaves to make them stand out.
6. Design Considerations
- Composition: Plan your design with a focal point, considering the placement of branches, leaves, and other details.
- Balance: Achieve balance and symmetry in your tree design to create a harmonious composition.
- Background: Consider the background fabric color to enhance the contrast and visibility of your embroidered tree.
7. Finishing Touches
- Final Details: Review your embroidered tree for any unfinished areas or uneven stitches.
- Trimming: Carefully trim any excess threads and secure loose ends on the back of the fabric.
- Display: Frame your finished embroidery or incorporate it into a larger project, such as a wall hanging or cushion cover.
8. Tips for Success
- Practice Patience: Embroidering a tree takes time and patience, especially when adding intricate details.
- Experiment: Don’t be afraid to experiment with different stitches and thread colors to achieve desired effects.
- Reference: Use photographs or sketches of trees for inspiration and as a reference for natural details.
Conclusion
Embroidering a tree allows you to blend creativity with nature, capturing the essence of trees in textile form. Whether you choose to stitch a realistic oak tree with intricate bark details or a stylized cherry blossom tree with delicate pink flowers, the techniques and stitches covered in this class provide a versatile toolkit for creating stunning tree embroideries. With practice and experimentation, you’ll develop the skills to bring trees to life on fabric, adding beauty and natural charm to your embroidery repertoire. Enjoy the journey of stitching trees and exploring the endless possibilities of embroidery artistry!

