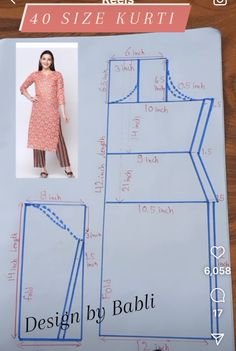
How to make Salwar
In this class, we will learn how to make a traditional Indian garment called a salwar. Salwar, also known as salwar kameez, is a popular outfit worn by women in many parts of South Asia, known for its comfort and versatility. The salwar consists of three main parts: the salwar (loose pants), the kameez (tunic), and the dupatta (scarf).
Materials Needed:

- Fabric: Choose fabric according to your preference and seasonality. Cotton and cotton blends are popular choices for their comfort, but you can also use silk, georgette, or synthetic fabrics depending on the occasion and desired look.
- Matching Thread: Ensure you have thread that matches your fabric to sew seams neatly.
- Elastic or Drawstring: For the waistband of the salwar, depending on your preference.
- Scissors, Pins, and Needles: Basic sewing supplies for cutting fabric and sewing seams.
- Measuring Tape: For taking accurate measurements.
- Iron and Ironing Board: To press seams and ensure a neat finish.
Steps to Make Salwar:
1. Taking Measurements:
- Waist: Measure around your natural waistline.
- Hips: Measure around the fullest part of your hips.
- Length: Measure from your waist to your ankle for the length of the salwar.
- Crotch Depth: Measure from your waist, between your legs, to where you want the crotch of the salwar to be.
2. Cutting the Fabric:
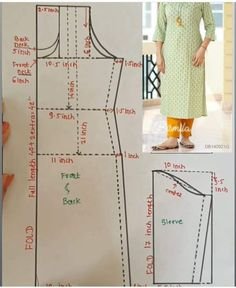
- Salwar:
- Cut two pieces of fabric according to the measurements.
- These pieces will be rectangular in shape with slight tapering towards the ankles.
- Waistband:
- Cut a strip of fabric for the waistband, accounting for elastic or drawstring insertion.
- Dupatta (optional):
- Cut a long piece of fabric for the dupatta, usually around 2.5 to 3 meters in length.
3. Sewing the Salwar:
- Joining the Legs:
- Fold each piece of salwar fabric in half lengthwise.
- Sew the inseams (inner leg seams) from the ankle up to the crotch depth.
- Creating the Crotch:
- Open up the fabric at the inseam and sew the crotch seam, ensuring it is strong and durable.
- Adding the Waistband:
- Fold over the waistband fabric to create a casing for the elastic or drawstring.
- Sew around the waistband, leaving a small opening to insert the elastic or drawstring.
4. Finishing Touches:
- Hemming:
- Hem the bottom of the salwar to the desired length.
- You can use a simple rolled hem or a decorative finish depending on your fabric and style preference.
- Pressing:
- Press all seams and the waistband to give your salwar a crisp finish.
- Dupatta (if applicable):
- Hem the edges of the dupatta for a clean look.
5. Final Adjustments:
- Try on the salwar to ensure the fit is comfortable and the length is appropriate.
- Make any necessary adjustments to the waistband or hem.
Additional Tips:
- Pattern Variations: Explore different styles of salwar such as churidar, patiala, or straight-cut depending on your preference.
- Embroidery and Embellishments: You can embellish your salwar with embroidery, sequins, or beads for a personalized touch.
- Practice Makes Perfect: Sewing salwar might take some practice, especially perfecting the fit and the seams.
Conclusion:
By following these steps and tips, you can create your own comfortable and stylish salwar. Remember, sewing is a skill that improves with practice, so don’t be discouraged if your first attempt isn’t perfect. Enjoy the process of creating your own clothing and experimenting with different fabrics and styles. Happy sewing!

