Back Stitch
Welcome to today’s class on mastering the back stitch—a versatile and durable hand sewing technique essential for both practical garment construction and intricate embroidery. In this session, we will explore the fundamentals of back stitch, its applications in creating strong seams and decorative embellishments, and practical exercises to hone your skills.
Materials Needed:
- Fabric: Choose a fabric suitable for practicing sewing techniques, such as cotton or linen for ease of stitching and durability.
- Needles: Select hand-sewing needles appropriate for the fabric weight and thickness.
- Thread: Use sewing thread or embroidery floss depending on whether you are focusing on construction or decoration.
- Scissors: Sharp scissors for cutting fabric and thread.
- Ruler and Marking Tools: For measuring and marking fabric accurately.
- Thimble: Optional but recommended for protecting fingers during extensive stitching.
Understanding Back Stitch:
1. Definition and Purpose:
- Back Stitch: A hand sewing technique where each stitch overlaps with the previous one, creating a strong and flexible seam or decorative line.
- Purpose: Used for creating durable seams, outlining designs in embroidery, and adding decorative stitches with precise control.
2. Types of Back Stitch:
- Basic Back Stitch: A straight line of stitches where each stitch begins slightly behind the end of the previous one.
- Double Back Stitch: Two parallel lines of back stitches, often used for decorative purposes or reinforcing seams.
3. Key Characteristics:
- Strength: Provides a stronger and more secure seam compared to running stitch.
- Flexibility: Despite its strength, back stitch retains flexibility, making it suitable for garment construction.
- Versatility: Can be used for both functional sewing and decorative embroidery.
Practical Application of Back Stitch:
1. Garment Construction:
- Seams and Hems: Use back stitch to sew seams and hems, ensuring durability and a neat finish.
- Reinforcing: Reinforce areas prone to stress, such as pocket openings, with back stitches to prevent tearing.
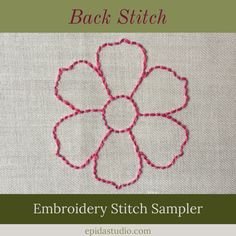
2. Decorative Embroidery:
- Outline Stitch: Outline designs, motifs, or lettering with back stitch for clear and defined lines.
- Filling Stitches: Combine back stitch with other embroidery stitches to fill shapes or create textured patterns.
Step-by-Step Guide to Back Stitch:
1. Setting Up:
- Thread Selection: Choose a thread color that complements or contrasts with your fabric for visibility.
- Needle Threading: Thread the needle with a suitable length of thread, knotting one end securely.
2. Starting the Stitch:
- Marking: Use fabric chalk or a water-soluble pen to mark the stitching line or design outline on the fabric.
- Initial Stitch: Bring the needle up through the fabric at the starting point of your stitching line.
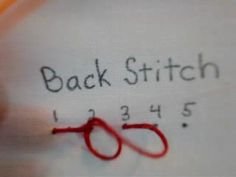
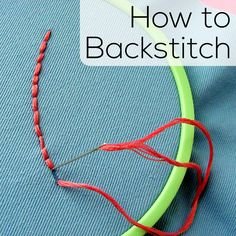
3. Executing Back Stitch:
- First Stitch: Insert the needle back into the fabric slightly ahead of the starting point, forming the first stitch.
- Back Stitch: Bring the needle up through the fabric at a point equal to the desired stitch length.
- Repeating: Continue stitching backward, bringing the needle up through the fabric where the previous stitch ended.
4. Completing the Stitch:
- Consistency: Maintain consistent stitch length and spacing for a uniform appearance.
- Finishing: Knot the thread securely on the wrong side of the fabric once you have completed the stitching line.
5. Practice Exercise: Creating Back Stitch Seams
Materials Needed:
- Fabric squares or strips
- Thread and needle
- Scissors
Instructions:
- Step 1: Cut fabric squares or strips approximately 6 inches long and 4 inches wide.
- Step 2: Mark a straight line along one edge of the fabric using fabric chalk or a water-soluble pen.
- Step 3: Thread your needle with a contrasting thread color and knot one end securely.
- Step 4: Begin stitching from one end of the marked line using back stitch.
- Step 5: Continue stitching until you reach the end of the line, maintaining even stitches.
- Step 6: Knot and secure the thread on the wrong side of the fabric.
Tips for Success:
- Practice controlling stitch length and maintaining even tension.
- Experiment with different thread weights and colors to explore the visual impact of back stitch.
- Gradually increase the complexity of your practice exercises by incorporating curves or intricate designs.
Advanced Techniques and Variations:
1. Double Back Stitch:
- Stitch two parallel lines of back stitch for added strength or decorative effect.
2. Combination with Other Stitches:
- Combine back stitch with running stitch, satin stitch, or French knots to create dynamic textures and patterns.
3. Design Considerations:
- Customize your back stitch designs by varying stitch length, spacing, and direction.
- Experiment with patterned fabrics and contrasting threads for unique visual effects.
Conclusion:
Back stitch is a foundational sewing technique valued for its strength, versatility, and aesthetic appeal in both garment construction and embroidery. By mastering the art of back stitch, you gain the skills to create durable seams, enhance garment details, and explore endless creative possibilities in textile arts. Through practice and experimentation, you can refine your stitching technique and develop a personal style that reflects your craftsmanship and creativity.