Which Treatment is Best for Hair Straightening
Permanent hair straightening treatments are a form of chemical
processing for your hair. Depending on what method of processing
you use, hair that’s naturally curly or textured can be altered to lay
flat and lose its curl.
These treatments work for several months or more, usually lasting
until new hair grows in to replace the hair that was treated. For this
reason, these processes are called permanent hair straightening.
The “permanent hair straightening” label can be used to refer to
keratin treatments, thermal straightening, and “perm” straightening
processes. If you find your wavy or curly hair hard to style or just
want a change in your look, these processes can be appealing.
Self at-home treatments and salon treatments are both popular
options. This article will help you be informed about the pros and
cons of this kind of hair treatment.
Types of treatments
There are several types of treatments that claim to make your hair straighter. Each relies on a different chemical
formula and processing method. Some of these treatments are sold in kits that you can do yourself at home,
while others require salon-grade equipment to be done effectively.
Professional permanent straightening
A perm refers to a chemical process that permanently alters the hair follicle. Perms are sometimes associated
with creating curls in hair that doesn’t naturally have it, but they can be used to make hair straight, too.
Perms are usually done in one appointment that takes a few hours. The cost of a perm can vary according to
your salon and how long your hair is. Typically, prices start around $50.
At-home perms
Chemical relaxant kits can be purchased at pharmacies and beauty supply stores. These treatments claim to
offer the same results as a perm from a salon. Unless you have formal cosmetology training, it will be tricky to
use these kits effectively. At-home perm options tend to start around $15.
Semi-permanent hair straightening
Keratin hair treatments, Brazilian blowouts, and semi-permanent hair straightening all refer to a method of
treating your hair for a straight texture that lasts 3 to 5 months. This method can take multiple salon appointments
to finish application, and typically costs over $150.
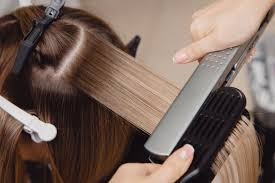
Thermal straightening
Japanese thermal hair straightening, also called an acid perm, is more similar to a traditional “straight” perm than
it is to a keratin treatment.
How it works
All permanent hair straightening methods use the same strategy.
A chemical solution is applied to your hair. These chemicals change the way that the proteins in your hair are
configured.
With perms and thermal straightening procedures, a neutralizer is then applied to your hair. This neutralizer
causes your hair to lock into its new shape, with new bonds forming between the protein molecules of your hair.
It can take several hours to infuse the hair with the chemical solution, apply the neutralizer, and style your hair.

These chemical solutions often carry strong scents, and in many cases you’re cautioned against getting your hair
wet or even sweating too much in the days following the treatment.
This means that you’re walking around inhaling the chemicals used to treat your hair, as well as exposing
everyone near you to them.
Side effects
Hair breakage after a permanent hair straightening treatment is somewhat common. The chemical solution works
by, in essence, damaging your hair so it lies flat or releases its natural curl.
This means that your hair may be harder to style and take longer to dry until it grows out and new, untreated hair
takes its place.
There’s also a concern about the chemicals used for these straightening processes.
Formaldehyde, which is in almost all straightening solutions, is a known carcinogen. Applying it to your hair and
inhaling fumes causes exposure strong enough to cause side effects. These may include respiratory difficulties,
irritation to your nose and eyes, and skin redness and irritation.
What about natural products?
Even “all-natural” or “formaldehyde-free” formulas of hair straighteners are often full of duplicate chemicals that
become formaldehyde when they’re heated.
A 2014 study on Brazilian keratin hair straightening treatments found formaldehyde levels that were deemed high
enough to pose a health hazard for consumers.
Of course, it’s better for your health to look for low-exposure options, but this is a case where reading the labels
and asking questions won’t necessarily yield the truth about the product you’re using.
According to the Environmental Working Group, chemical straighteners that are lye-free or alkaline sulfite-based
are safer than some alternatives. Of course, the safest option of all is to avoid exposure to harmful chemicals that
can absorb through your scalp and your nasal passages.
You shouldn’t get any of these permanent straightening treatments if you’re pregnant or trying to become
pregnant.
The pros and cons of each hair straightening depend on
what method you’re considering.
Permanent hair straightening
Pros of permanent hair straightening
● Permanent straightening at the salon is the
cheapest of the salon options for getting results, and the
least time-consuming.
● It lasts for up to 6 months, and as untreated hair
grows in, the weight of the treated hair beneath it can
mean it grows in looking like soft waves.
Cons of permanent hair straightening
● Perms work by damaging your hair follicles so they can’t hold their natural shape.
● Split ends, breakage, and hair loss can occur. You’re also exposing your body to harmful chemicals
during the perm process.
● After getting a perm, you can’t color-treat or otherwise modify your hair, and you won’t be able to wear it
curly, even if you want to.
At-home perms
Pros of at-home perms
● DIY hair-straightening kits you can get at the pharmacy are affordable.
● They claim to be simple to use.
● They don’t require hours spent in a salon chair, and the chemicals are approved for home use, which
means they may be less concentrated.
Cons of at-home perms
● For the most part, you’re not going to get salon results with a home straightening solution.
● You could damage your hair, to the same extent or a greater extent than you would if you went to a
stylist.
● Some consumers have reported that home hair straightening kits don’t last for more than a single wash.
Keratin treatments
Pros of keratin treatments
● Keratin treatments claim to condition your hair, and the result from the keratin treatment is softer and
smoother than other treatments that make hair feel “fried.”
● These treatments last for 4 to 6 months, which is a significant amount of time.
Cons of keratin treatments
● Keratin treatments don’t leave your hair pin-straight, only less curly or wavy than it was before.
● Keratin treatments are semi-permanent, meaning that after a few months, the results start to wash out.
● Your hair won’t return to its natural state, and you might not like the look of how new hair growth looks at
the crown of your head.
● Most of these treatments also contain harmful chemicals, even if they claim to be free of them.
Thermal straightening
Pros of thermal straightening
● Japanese hair straightening claims to leave your hair pin-straight and easy to maintain.
● Many people love the sleek and simple look of hair that hangs straight down without any additional
maintenance required.
● Results are long-lasting, with hair typically staying straight until new hair growth appears.
Cons of thermal straightening
● This method of hair straightening does damage to your hair just like other options. It also consists of
dangerous chemicals that you’re breathing in and absorbing through your skin.
● Thermal straightening is quite expensive and takes hours to complete the process.
● Once your hair starts to grow back, there’s often a stark contrast between the hair that’s been treated
and your natural hair at the root.
● People who get this kind of hair straightening sometimes find it difficult to stop, and need touch-ups
several times a year.
How long does it last
Semi-permanent hair straightening lasts 3 to 4 months before your natural hair texture starts to reappear.
Home hair straightening kits don’t often last longer than 6 weeks.
Permanent hair straightening done in a salon lasts anywhere from 4 to 6 months. Once your roots start to grow
in, you’ll need to decide if you’re going to repeat the treatment or wait for it to grow out completely.
The bottom line
Permanent hair straightening refers to treatments that will make your hair straight beyond a wash or two. Beyond
that vague definition, your results will vary widely according to your hair type, how quickly it grows, and the
chemical method you use to straighten your hair.
Keep in mind that “permanent” doesn’t mean forever — it just refers to the duration of one life cycle of your hair.
Speak to your hairstylist about your options, and what they think might be the best one for you.
How To Use Every Type of Curling Iron
Creating voluminous, shiny, curly hair is the easiest way to glam
up your look, no question about it. But if you weren’t blessed
with naturally curly hair, it can be a bit of a gamble to try to bring
curls to life with a curling iron or wand. To take the guesswork
out of how to use a curling iron and make the overall styling
process easier, we’ve put together tutorials on how to curl your
hair with both curling irons and wands, including automatic
curling irons. Trust us: With the right tool and styling products
(like hair mousse, heat protectant, and hair spray), you’ll be able
to confidently curl your hair in no time. Here are step-by-step
instructions on how to use a curling iron, curling wand, and automatic curling iron.
Step 1: Select Your Tool
Before buying your curling tool of choice, take a few things into consideration. For starters, determine if you
prefer a curling iron with a clamp or a wand. A curling iron with a clamp, as you can probably guess, features a
clamp that helps hold your hair in place as you curl. A wand curling iron has no clamp. Instead, you wrap your
hair around the barrel and hold it in place while the curl forms. Your choice is all based on personal preference
and which you find easier to use.
Next, think about how curly you want your hair to be. If you’re looking to create tightly wound coils, you’ll want to
choose a barrel size of ¾-inch or less. If big, bouncy beachy
waves are more your jam, pick up a curling iron with a barrel size
of one-inch or more.
As far as types of curling tools go, ceramic and tourmaline ones
are always a good bet, as they can help minimize the look of
frizz. Then, there’s also the manual labor aspect—if winding your
hair around your curling iron barrel doesn’t sound ideal, an
automatic curling iron may be just what you need.

Step 2: Start Your Look With Freshly Washed Hair
To get the most out of your perfectly curled look, it’s a good idea to start off with clean hair. Hop in the shower
and use a system of shampoo and conditioner formulated to manage the appearance of frizz, like the L’Oréal
Paris EverPure Frizz-Defy Shampoo and the L’Oréal Paris EverPure Frizz-Defy Conditioner. Follow up by
applying a hair mousse, like the L’Oréal Paris Advanced Hairstyle CURVE IT Elastic Curl Mousse, to wet hair to
help add some volume.
Step 3: Blow-Dry Your Hair
Once your hair is about halfway air-dried, blow-dry it the rest of the way using a boar bristle brush until it’s
completely dry. Make sure to apply a heat protectant, like the L’Oréal Paris Advanced Hairstyle BLOW DRY IT
Thermal Smoother Cream, first.
Step 4: Test Your Curling Iron’s Heat
Now that you’ve blow-dried your hair, it’s time to get to work with that curling iron or wand. First, find the proper
heat setting for your hair. Typically, it’s a good idea to test out the lowest heat setting possible to see what type of
curl it creates. From there, you can adjust the heat as needed before you start.
Step 5: Section Your Hair
Once you’re done heating up your curling iron, divide your hair into two or three horizontally-stacked layers
depending on how thick your hair is (fewer to curl fine hair and more to style thick hair). Use a lobster clip to hold
the topmost layers out of the way while you start curling the bottom section. You want to curl your entire head of
hair—not just the top layers—because the more curls you create, the fuller your hair will look.
Step 6: Curl Your Hair
Now it’s time to reach for your curling weapon of choice. The process will depend on which one you chose (more
on that in a sec).
Step 7: Shake Out Your Curls
Once you’ve finished curling your whole head of hair, flip it over and give it a good shake to loosen up your look
for a more natural-looking finish.
Step 8: Set Your Curls
If needed, lightly mist your hair with a hair spray, like the L’Oréal Paris Elnett Precious Oil Satin Hairspray to keep
your curls intact.
How To Use a Curling Iron, Curling Wand, and Automatic Curling Iron
Now that you know the tenets of using curling tools, allow us to explain how to use each one, based on your pick!
How To Use a Curling Iron With a Clamp
If you’re using a traditional curling iron, here’s what to do.
- Grab a section of hair. Create a section of hair to curl. The smaller the section, the tighter the curl. The
larger the section, the looser the curl. - Position your curling iron. Open the clamp of your iron, then place it toward the root of your section of hair,
with the hair placed between the open clamp and the iron. Be careful not to burn yourself. - Close and slide. Lightly close the clamp, then slide it down the section of hair until it’s at the very end.
Close the clamp fully. - Twist, twist, twist. Twist your curling iron up toward your roots, wrapping the length of the section around
it in the process. Wait about 10 to 15 seconds for your hair to heat up. - Open the clamp and release. Gently open the clamp and pull the curling iron from your hair, allowing
the curl you just created to hang freely. Not too hard, right?
How To Use a Curling Wand
If you’ve decided to use a curling wand instead, here’s how. - Section your hair. Like with a curling iron, you’ll want to start by splitting off a section of hair to curl.
Remember, smaller sections create tighter curls while larger sections create looser curls. - Position your wand. Hold the wand in the hand that’s opposite the side of the hair you’re curling. Then,
place it so the base of it is near the root of your section of hair with the barrel pointing downward. - Wrap around. Using your other hand, wrap the length of your section of hair around the barrel, working your
way down so that your ends are wrapped around the smallest part of your wand. - Wait and release.Let your hair heat up for around 10 to 15 seconds, then unwrap your hair and pull the
wand away to reveal a beautiful, bouncy curl.
Editor’s tip: If you prefer a more natural look, curl your hair away from your face. To do so, wind your hair down
and around your curling wand in a clockwise direction on the right and counterclockwise direction on the left.
How do you prep your hair for hot rollers?
Rough drying your hair to start is key, Lopez suggests. “I like to use the T3
Cura Luxe on low speed and high heat while rough drying in order to keep the
elasticity of the hair,” he says. “Once dry, prep the hair with a medium styling
mousse. The heat from the rollers will activate this mousse and give the look a
stronger memory. Finally, before I wrap each section around the hot rollers, I
spray with hairspray and brush through.” His go-to duo includes Kenra’s
Medium Hold Mousse and IGK’s Intern Flexible hairspray.
Can all hair types use hot rollers?
“Yes! Although for curly and natural hair types,
you want to smooth hair first and then use the
hot rollers,” Lopez insists. “The hot rollers won’t straighten or completely smooth
out naturally curly hair.”
Any other tips you have for using hot rollers?
“Sometimes I wrap the hair around the rollers like I would an iron because it can
give you more of a loose wave look,” Lopez says. “If you have long hair, pick up a
1-inch roller and wrap a section around the roller like a curling iron and clip it vertically. Once cool, release the
roller and you will achieve a long, loose curl.”
These no-fuss rollers will get you bouncy, shiny, classic curls. They also come with a travel case so you never
have to worry about a bad hair day on the road.
Professional Molecular 30-Piece Multiple Size Steam Hair Setter
This unique system uses steam to heat rollers individually. Wait for a roller to steam
up, take it to a section of hair, clip it, and repeat all over your head. It’s quick and,
most importantly, damage-free.
T3 Volumizing Hot Rollers Luxe
Lopez is a fan of these rollers because “the velvet flocking doesn’t tug or pull on the
hair and also seals in incredible shine.”
BaByliss PRO Nano Titanium Roller Hairsetter
With 20 rollers in a set, even folks with thick hair will be able to cover a full head in these easy-to-use rollers.
They come in small, medium, and large-sized barrels so you can vary the sizes of your curls and look more
natural.
Body & Shine Smooth Waves
For mega bounce, this kit comes with five 2-inch rollers and clips to make
the entire process super easy. The result? Runway-esque waves that offer
more volume than you’ve ever seen.
CHI Smart Magnify Ceramic Rollers
This kit is a no-muss no-fuss guide to bouncy,
voluminous hair. Included are nine rollers and
butterfly clips, all housed in a super transportable
bag. On the road waves? Don’t mind if I do.
Remington Pro Hair Setter with Thermaluxe
It only takes five minutes to see results from this hot
roller set. Because lower heat is distributed evenly
over a longer period of time, you’re really locking in a
style, so it will last for days.
Conair Compact Hairsetter
If you’re looking to try out hot rollers but don’t know
what size and aren’t committed to the lifestyle, grab
this compact variety pack. In this set you get eight
medium (3/4 inch), six large (1 inch), and six jumbo.