Make Designer Kurta
A designer kurta is a quintessential part of Indian ethnic wear, known for its versatility, elegance, and cultural significance. Whether it’s for everyday wear, festive occasions, or special events, a designer kurta can be customized to reflect personal style while embodying traditional craftsmanship and contemporary aesthetics. This class note will guide you through the process of designing and creating a designer kurta, covering everything from conceptualization to execution.
1. Conceptualization: Designing a designer kurta begins with a clear concept and vision. Consider the following aspects:
- Purpose: Determine the occasion or setting for which the kurta is intended (e.g., casual wear, formal event, festive attire).
- Inspiration: Draw inspiration from various sources such as traditional motifs, current fashion trends, nature, art, or personal experiences.
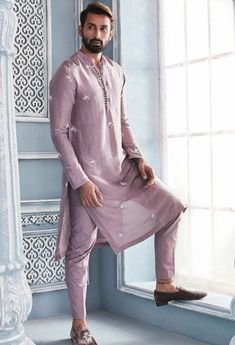
- Silhouette: Decide on the silhouette of the kurta (e.g., straight cut, A-line, asymmetric, angrakha style) based on comfort, body type, and design preferences.
- Color Palette: Choose a color palette that complements the wearer’s complexion and suits the occasion. Consider traditional hues as well as contemporary shades.
2. Fabric Selection: The fabric choice plays a crucial role in the comfort, drape, and overall aesthetic of the designer kurta. Popular fabrics for kurtas include:
- Cotton: Ideal for everyday wear due to its breathability and comfort.
- Silk: Adds a luxurious touch, suitable for festive and formal occasions.
- Chiffon, Georgette: Light and flowy fabrics that are perfect for summer and evening wear.
- Linen: Known for its crisp texture, linen is favored for its casual yet sophisticated appeal.
- Blends: Fabrics like cotton-silk blends or silk blends offer a combination of comfort and sheen.
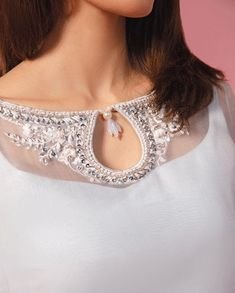
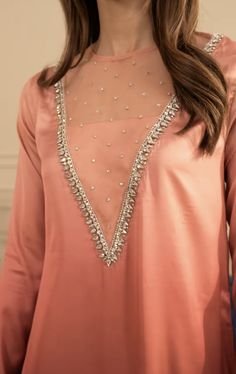
3. Design Elements: Incorporate design elements that enhance the aesthetic appeal and uniqueness of the kurta:
- Embroidery: Choose from a variety of embroidery techniques such as zardozi, gota patti, thread work, or machine embroidery. Embroidery can be intricate or minimalist, depending on the design theme.
- Prints: Consider block prints, digital prints, screen prints, or hand-painted motifs for a distinctive look.
- Trims and Embellishments: Add trims like lace, piping, or fabric borders (gota patti, mirror work) to accentuate the neckline, sleeves, or hemline.
- Buttons and Closure: Select buttons or closures (hooks, ties, zippers) that complement the overall design and fabric.
4. Pattern Making and Cutting: Once the design is finalized, create a pattern based on the wearer’s measurements or standard sizing:
- Measurements: Take accurate measurements of the wearer’s chest, shoulders, waist, hips, and length (for men and women).
- Drafting the Pattern: Use drafting tools or software to create a paper pattern based on the chosen silhouette and measurements.
- Cutting the Fabric: Transfer the pattern onto the selected fabric and carefully cut out the pieces, ensuring precision to maintain symmetry and alignment of design elements.
5. Construction Techniques: Assemble the kurta using appropriate construction techniques to ensure durability and a polished finish:
- Seam Finishing: Use techniques like French seams, overlocking, or zigzag stitching to prevent fraying and enhance the garment’s longevity.
- Assembly: Start with basic construction such as sewing shoulder seams, side seams, and sleeves (if applicable). Attach additional elements like collars, cuffs, or plackets as per the design.
- Fitting and Adjustments: Conduct fittings to ensure the kurta fits well and makes necessary adjustments for comfort and aesthetics.

6. Embellishment and Detailing: Enhance the kurta with embellishments and detailing that elevate its designer appeal:
- Embroidery Placement: Skillfully place embroidery motifs or embellishments on the kurta, ensuring even distribution and balance.
- Finishing Touches: Add final touches such as decorative stitches, hemming, and pressing to create a crisp and polished look.
7. Final Presentation: Prepare the designer kurta for presentation or wearing:
- Pressing and Steaming: Steam or press the kurta to remove any wrinkles and enhance its appearance.
- Styling: Coordinate the kurta with suitable bottoms (churidar, palazzo, trousers) and accessories (dupatta, jewelry, footwear) to complete the ensemble.
8. Care and Maintenance: Provide guidance on caring for the designer kurta to maintain its quality and appearance:
- Cleaning Instructions: Recommend appropriate cleaning methods (dry cleaning, hand washing) based on the fabric type and embellishments.
- Storage: Advise on storing the kurta in a cool, dry place to prevent damage and maintain its shape.
Conclusion: Designing and creating a designer kurta involves a blend of creativity, craftsmanship, and attention to detail. By following the steps outlined in this class note, you can craft a kurta that not only reflects your personal style but also celebrates the rich tradition of Indian textile arts. Embrace the journey of creating bespoke attire that resonates with cultural heritage while embracing contemporary design sensibilities.
