Drafting and Cutting
Drafting and Cutting
Unit Objectives
At the end of this unit, you will be able to:
Understand drafting and cutting
Draft the garments
Cut the garments
Introduction
Long sleeve shirt is a common wear of men used as upper body wear Example shown in section 2.6.2 has
subsequent specifics
Selected fabrics: poplin,cotton, silk, crepe, polyester, oxford cotton
Materials required: 2 50 mts cloth width is 36″
Measurement required:
back length = 32″
n.w length = 17″
shoulder width = 17″
chest = 36″
waist = 32″
n.w length 17″
shoulder width = 17″
hip or seat 38″
sleeve length = 24″
cuff size=2%” 11″
pocket size = 5″ *5%”
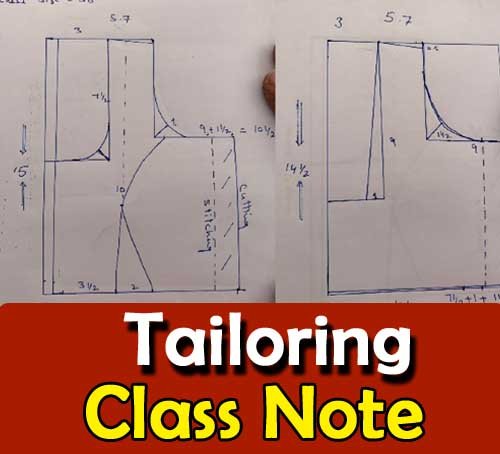
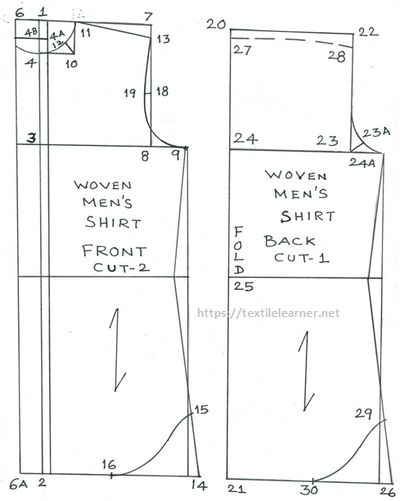
Drafting and Cutting of Long Sleeve Shirt
Drafting details front part:
1-2 full length + 1″
1-3 chest/4(-) ½”, arm depth.
1-4=1/6th neck measure.
4-4a=1″ as per draft.
4a-4b” for button stand.
4b-6-1% for placket
4b-2b draw a line as per draft
6-6a draw a line as per draft
1.7 = 1/2 shoulder width +1/2^ prime prime for seam.
7 -8 = draw a line
3-9 1/3rd chest measure
10 – 4 = 1/6th neck measure
⚫ 10 -11 = draw line as per draft
10 – 12 = 1 degrees as per draft
.13-7 shoulders slope 1y 2 ^ –
14 – 2 = same as 9-3 measure.
14 -15=4\%^ as standard measure
14 – 16 = 5 % as standard measure
17 -8=1^ prime prime as per draft
⚫ 18 is a middle measure of 13-8 distance

18-19-3/4″ as per draft
13,19,17.19 draw arm hole shape with arm curve
⚫ Cut the front part
Back part:
20-21= length +1″
22 – 24 = 1/4 * th chest (-)” (armhole depth)
20-25=n.1 length +1/2^ prime prime
22-23 draw a line
24 – 24a = 1/3rd chest (- 11x^ prime prime
23-23a=1″ at 45″
20-.27=1^ prime prime as per draft
• 22 – 28 = 1 degrees as per draft
⚫ 26-29=4%½” as shown in draft
26 -30=5\%^ prime prime as shown in draft
Shoulder part:
1 – 2 = 1 / l 8th chest +1/2^ prime prime
1.-3 = y shoulder width +1/2^ prime prime for seam
3 – 4 = draw a line
4 – 5=1/2^ prime prime as per draft
1-6 = ⅙ th neck + ¾.
6-7=2”noted as per draft
6-8-1” as per draft
3-9-=2” as per draft
Long sleeve part
1-2-sleeve length .1 / (2 ^ – 1) * 1 cuff with
h >= 1 degrees
1.3 – mm chest c
3-4-1/4th chest .1 / (2 ^ – 1) 5.2% cuff IN
5.6-1/2^ – as per draft
7- middle or 5-2 measure
. 7-8-4 ½” pocket open.
9 =½” or 1-4.
. . 9.-10 – 1 degrees * 4 10 1 back arm shape is to be drawn
11 middle of 9-4 measure
12 – 113\%4 per draft 4 12 9. 1.draw the front arm as per draft
Cuff draft:
1- 2 = cuff width
1-3 cuff length to be cut on fusible interlining as stiffer portion.
• Sleeve pocket length 5″
• Width 11/4^ –
. Box 1 ¼” as ready portion and added all around ” for seam margin
Collar part:
1-.2 = neck measure
. 2 – 4=2” as standard.
.2.5=3/8^ prime as per draft
4-6-3/8″ as per draft.
7-.5 collar point 3.1/8″
Neck band:
⚫ 8-.9=½” neck measure
9-10 1 3/8″ as per draft
11-8-1 3/8″ as per draft.
10-12 1 3/8″ as per draft
10-14= 1/8″ as per draft.
To be cut fusible interlining allow to cut self fabric along with seam margin necessarily ½” .
Drafting and Cutting of Saree Blouse
Measurements Needed
Shoulder measurement :
Taken between two shoulder ends or nape of the neck to one shoulder end and doubled. When neckline depth is more than 1/6th of the bust round, shoulder measurement is taken about 3cm to 4cm less on each side.
Armscye Depth or Armhole Depth:
Taken by direct measurement or calculated from the Bust Circumference
It is the best to measure the armscye depth directly on the body for accurate measurement. It is measured straight from the shoulder end to about ½ an inch below the armpit Armscye depth varies from 13cm-18 (or about 5 inch – 7 inch) in the increasing order from the small sizes to the larger ones.
Armscye depth can be calculated from the bust circumference in many of the ways by different dressmakers for different outfits.
For a sari blouse, following calculation is found to be the best
1/6th of Bust Circumference
Front & Back Neck depths:
Taken directly on the body or taken from an existing garment.
Bust Circumference:
Taken around the fullest part of the bust.
Waist Circumference:
Taken around the navel point.
Bust Point or Pivot Point:
Taken straight down the shoulder to the bust point
Waist Length:
Taken from the nape of the neck to the desired length of the blouse
Drafting & Cutting Instructions For A Basic Blouse With Waistline Dart
Front part:
1 Square down centre front line and shoulder lines.
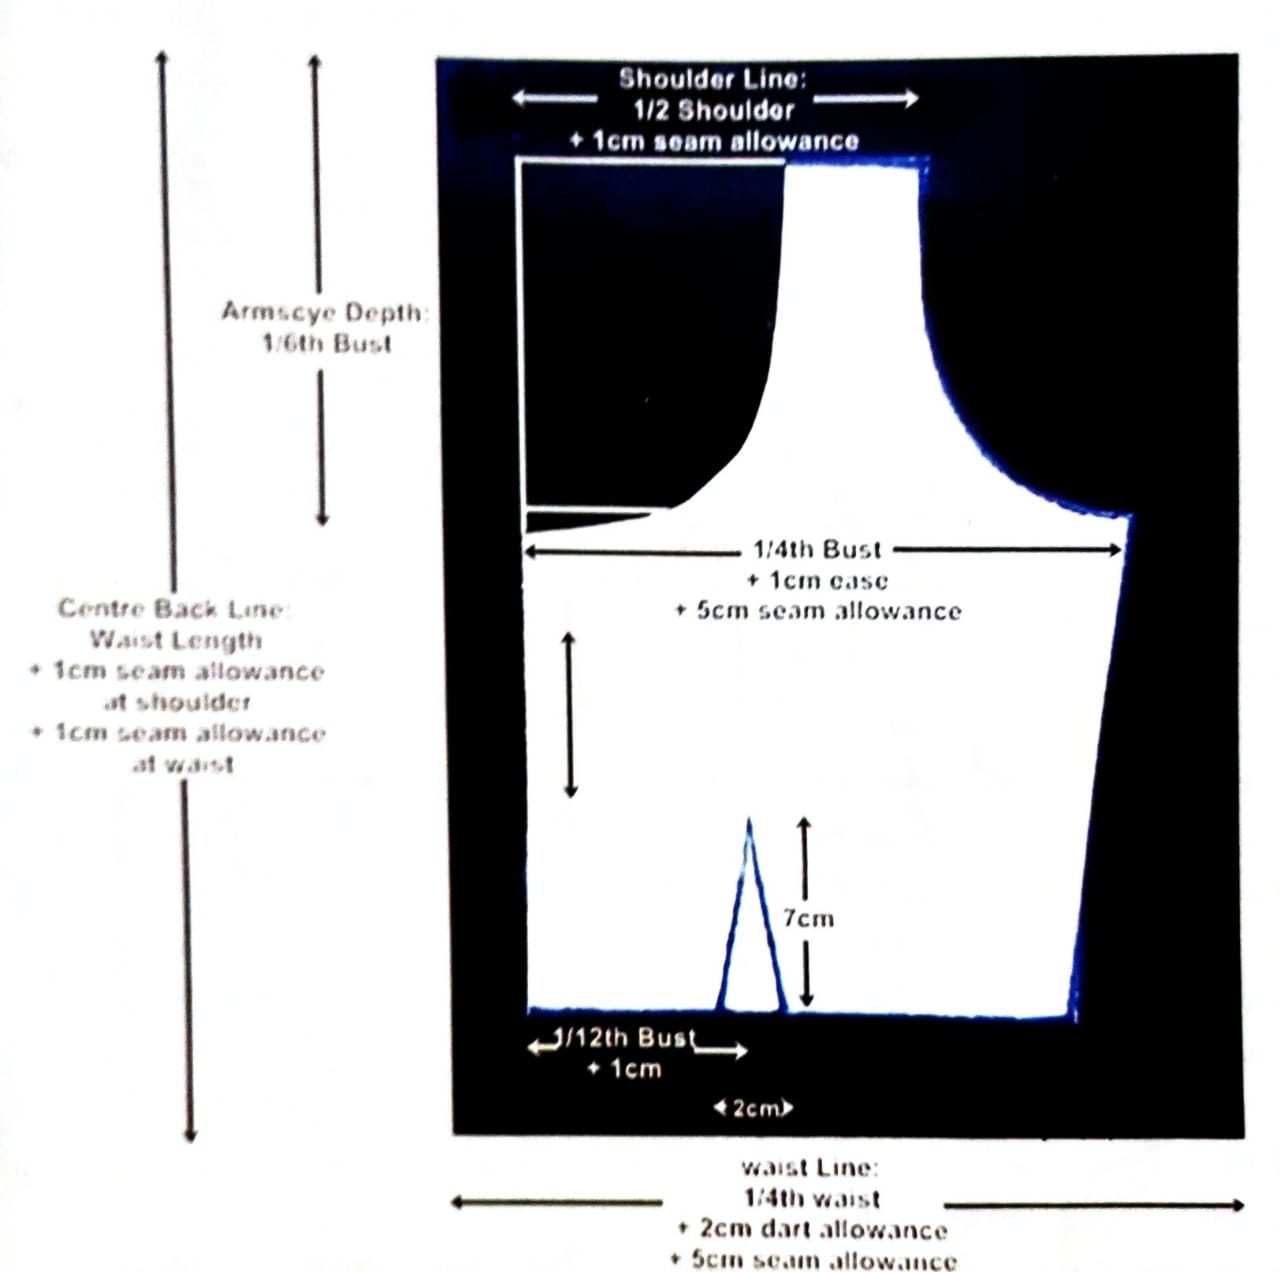
Centre Front Line: Waist Length + 1cm for seam allowance at shoulder + 1cm seam allowance at waist
Shoulder Line: %% of Shoulder Measurement + 1cm seam allowance. Shoulders can be taken square or sloped. This depends on the garment to be made. Since a sari blouse is usually of wide neck, no slope is suggested here.
2 Square Armscye Depth down the Centre Front Line. Take 1/4th of the Bust Circumference + 1cm ease + 5cm seam allowance, horizontally. This wide seam allowance is useful for alterations.
3. Drop a straight line from shoulder end on to Armscye Depth Draw front armhole shape about 1cm inward
this dropped line.
4. Square Waist Line at the bottom of the Centre Front Line Take 1/4th Waist Circumference + 5cm dart allowance + 5cm seam allowance. Give a rounded shape at the sides
Drafting and Cutting of Saree Blouse
Measurements Needed
Shoulder Measurement
Taken between two shoulder ends or nape of the neck to one shoulder end and doubled. When neckline depth is more than 1/6th of the bust round, shoulder measurement is taken about 3cm to 4cm less on each side.
Armscye Depth or Armhole Depth:
Taken by direct measurement or calculated from the Bust Circumference
It is the best to measure the armscye depth directly on the body for accurate measurement. It is measured straight from the shoulder end to about an inch below the armpit Armscye depth varies from 13cm-18 cm (or about 5 inch – 7 inch) in the increasing order from the small sizes to the larger ones
Armscye depth can be calculated from the bust circumference in many of the ways by different dressmaker for different outfits.
For a sari blouse, following calculation is found to be the best
1/6th of Bust Circumference
Front & Back Neck depths:
Taken directly on the body or taken from an existing garment
Bust Circumference:
Taken around the fullest part of the bust.
Waist Circumference:
Taken around the navel point.
Bust Point or Pivot Point:
Taken straight down the shoulder to the bust point
.Waist Length:
Taken from the nape of the neck to the desired length of the blouse.
Drafting & Cutting Instructions For A Basic Blouse With Waistline Dart
Front part:
1 Square down centre front line and shoulder lines Centre Front Line Waist Length + 1cm for seam allowance at shoulder + 1cm seam allowance at waist
Shoulder Line: ½” of Shoulder Measurement + 1cm seam allowance. Shoulder can be taken square of sloped. This depends up on the garment to be made. Since a sari blouse is usually of wide neck, no slope is suggested here.
2 Square Armscye Depth down the Centre Front Line. Take 1/4th of the Bust Circumference + 1cm ease + 5cm seam allowance, horizontally. This wide seam allowance is useful for alterations.
3. Drop a straight line from shoulder end on to Armscye Depth Draw front armhole shape about 1cm inward
this dropped line.
4. Square Waist Line at the bottom of the Centre Front Line Take 1/4th Waist Circumference + 5cm dart allowance + 5cm seam allowance. Give a rounded shape at the sides
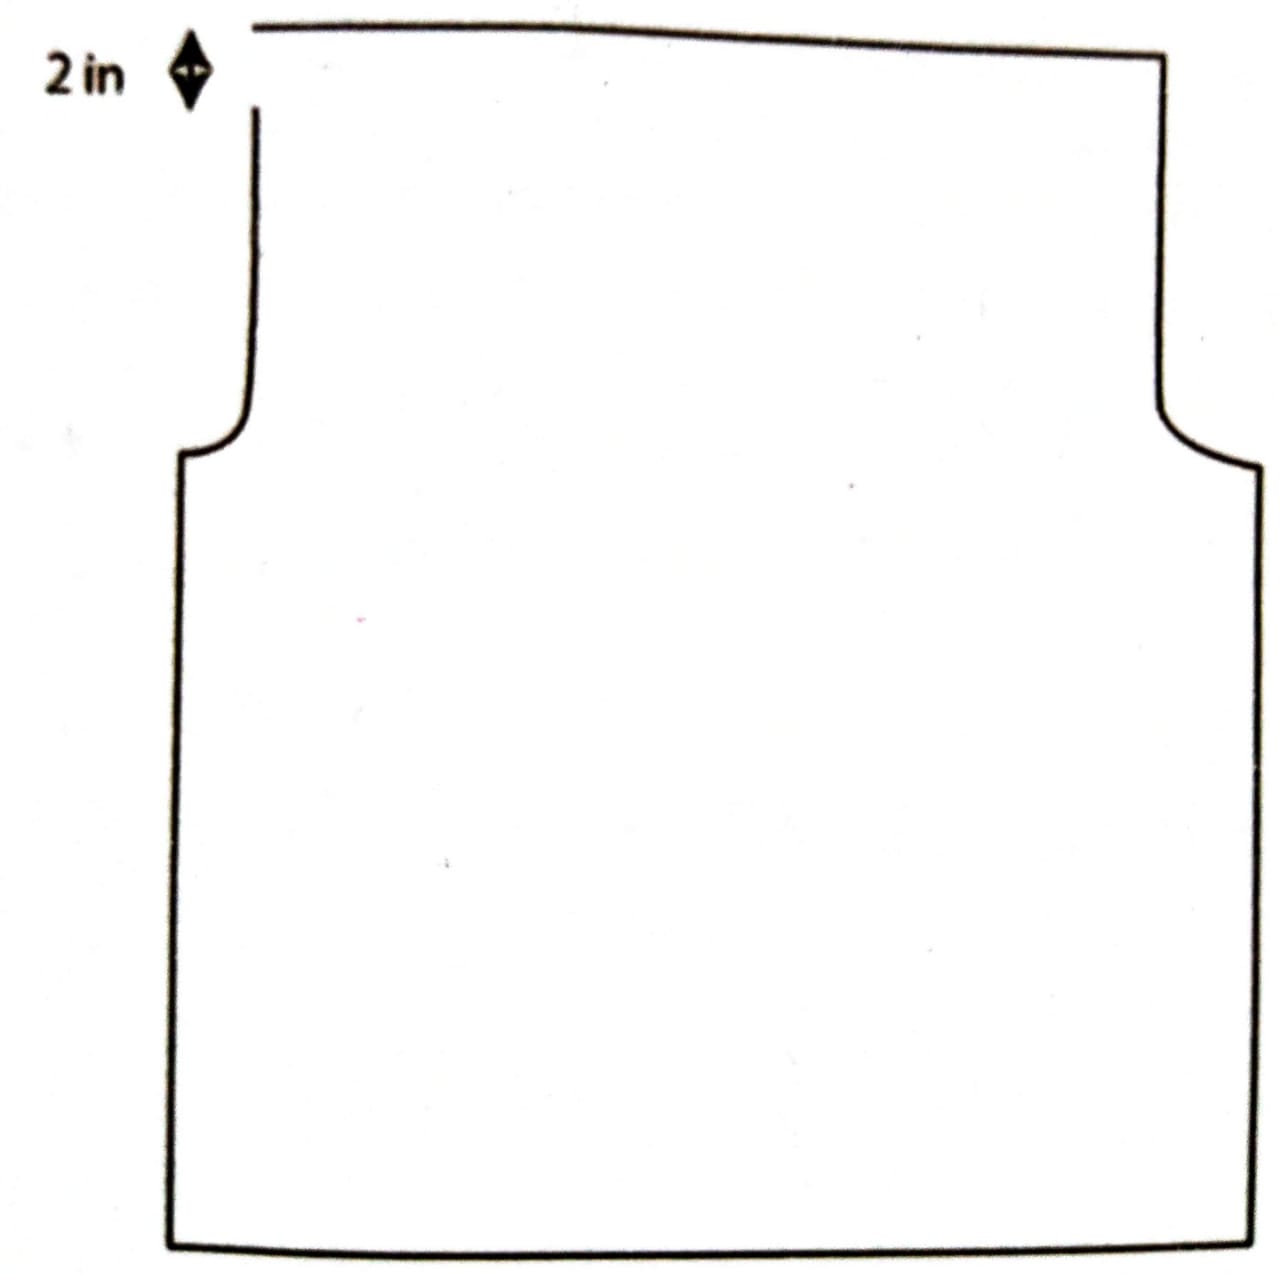
Basic Pattern for Sari Blouse
(With Waist Line Darts)
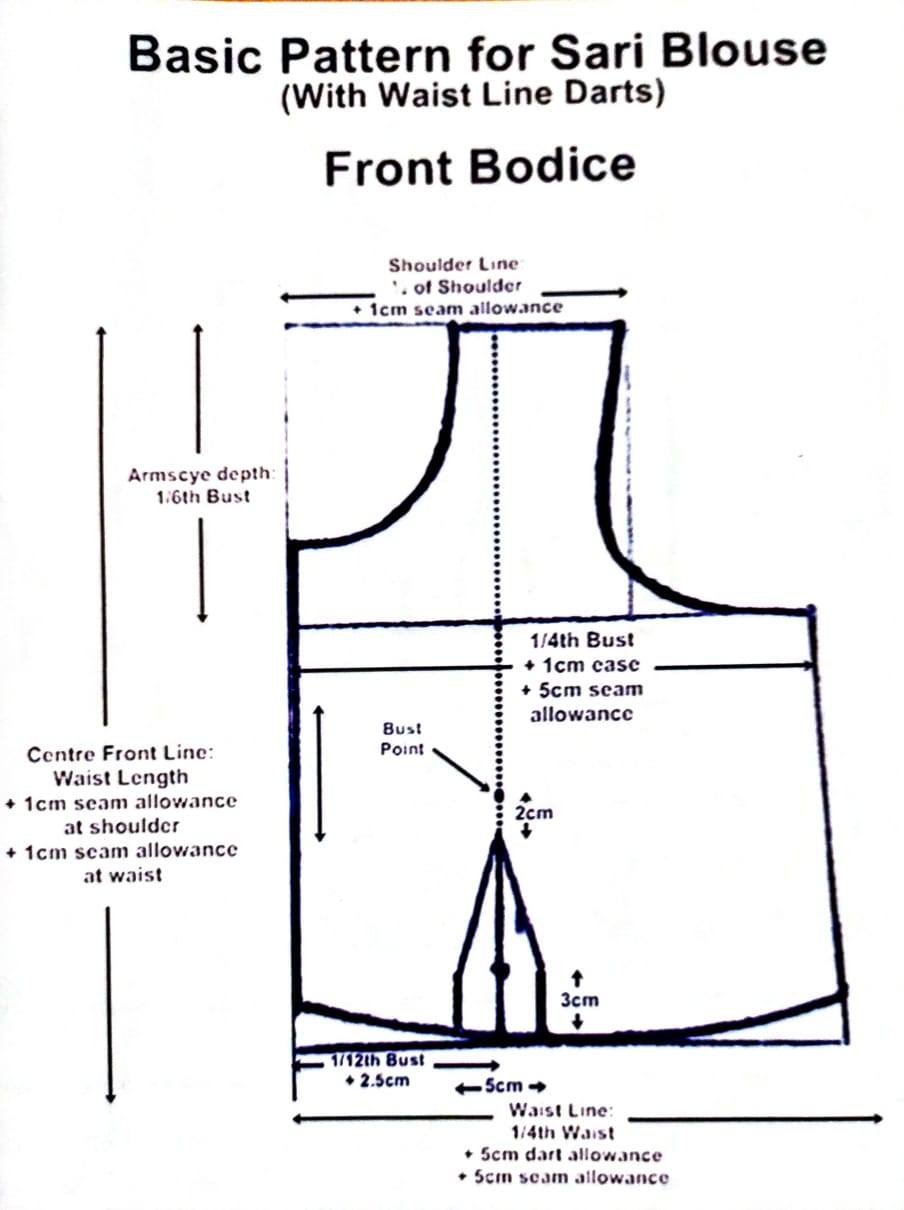
Front Bodice
Dart: Take 1/12th of the Bust Circumference + 2. 5cm at waist from the centre front: Draw an upright line.
Measurement a point at about 3cm from the waist (Note: This will be the starting point of the waist, exactly under the bust part)
>>Mark a Dart of about 5cm here taking 2.5cm on each side Measure and mark Bust Point on the same line from the shoulder Dart point will be about 2cm below the bust point. Draw a dart as shown
6.Join the end points of Armscye Depth line and waistline.
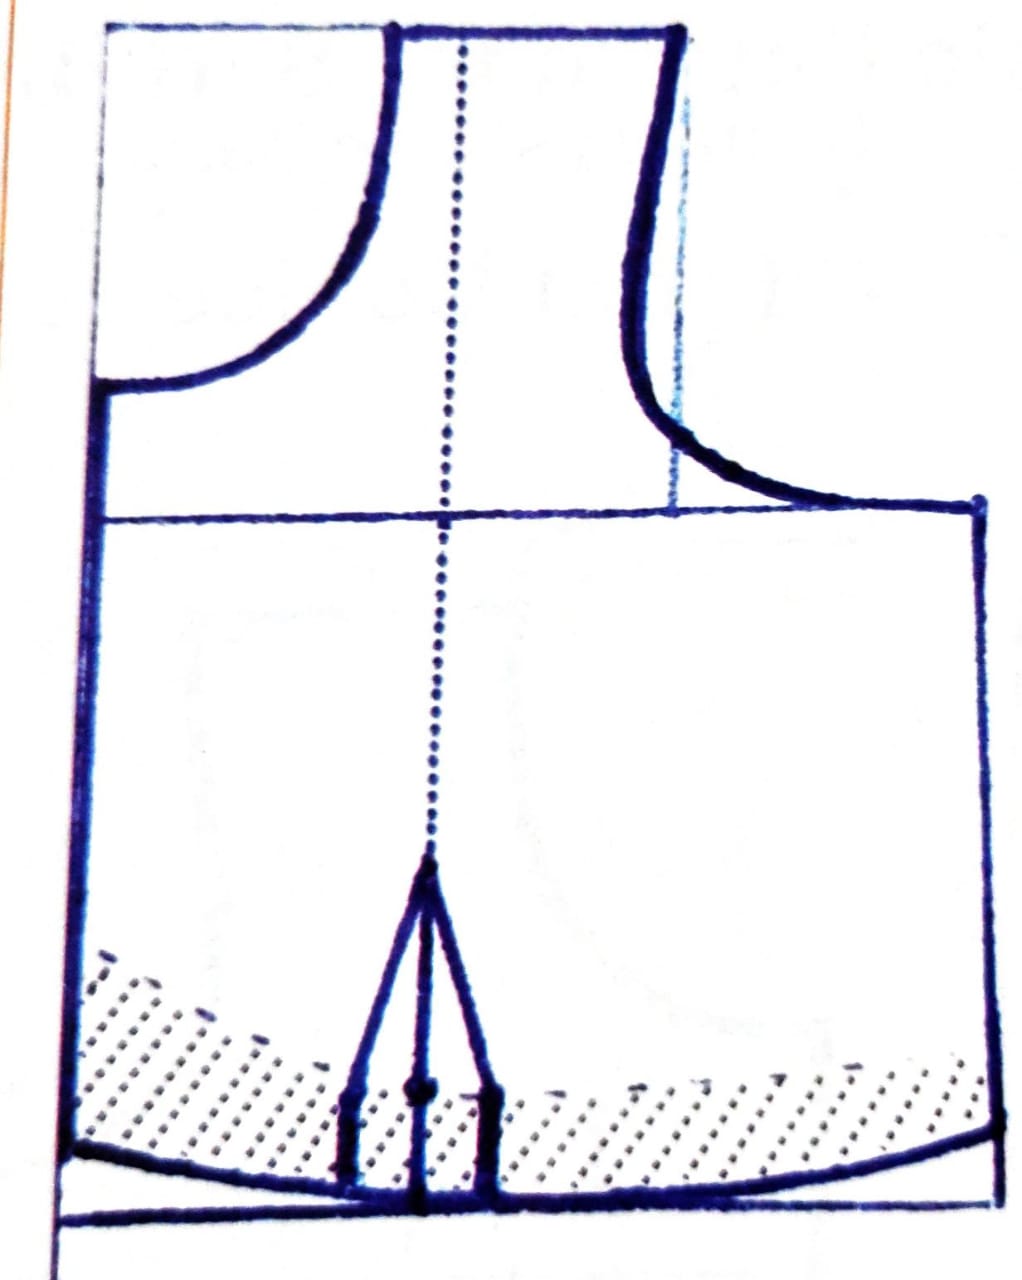
7.Draw desired front neckline.
8.Cut along the highlighted outline excluding the darts as shown.
Back Part:
1 Square down centre back line and shoulder lines
Centre Back Line: Waist Length + 1 cm for seam allowance at shoulder 1cm seam allowance at waist
Shoulder Line % of Shoulder Measurement + 1cm seam allowance
2.Square Armscye Depth down the Centre Back Line Take 1/4th of the Bust Circumference + 1cm ease+ 5 Sem seam allowance, horizontally. This wide seam allowance is useful for alterations
3.Drop a straight line from shoulder end on to Armscye Depth Draw back armhole shape on this dropped line
4.Square WaistLine at the bottom of the Centre Back Line Take 1/4th Waist Circumference+2cm dart allowance +5cm seam allowance You may need to shape the waistline a little to match it to the front
5.Dart: Mark a dart on the waist line at 1/12th of Bust Circumference + 1cm This dart is about 7cm in length
with 1cm width on each side.
6 Join the end points of Armscye Depth line and waistline.
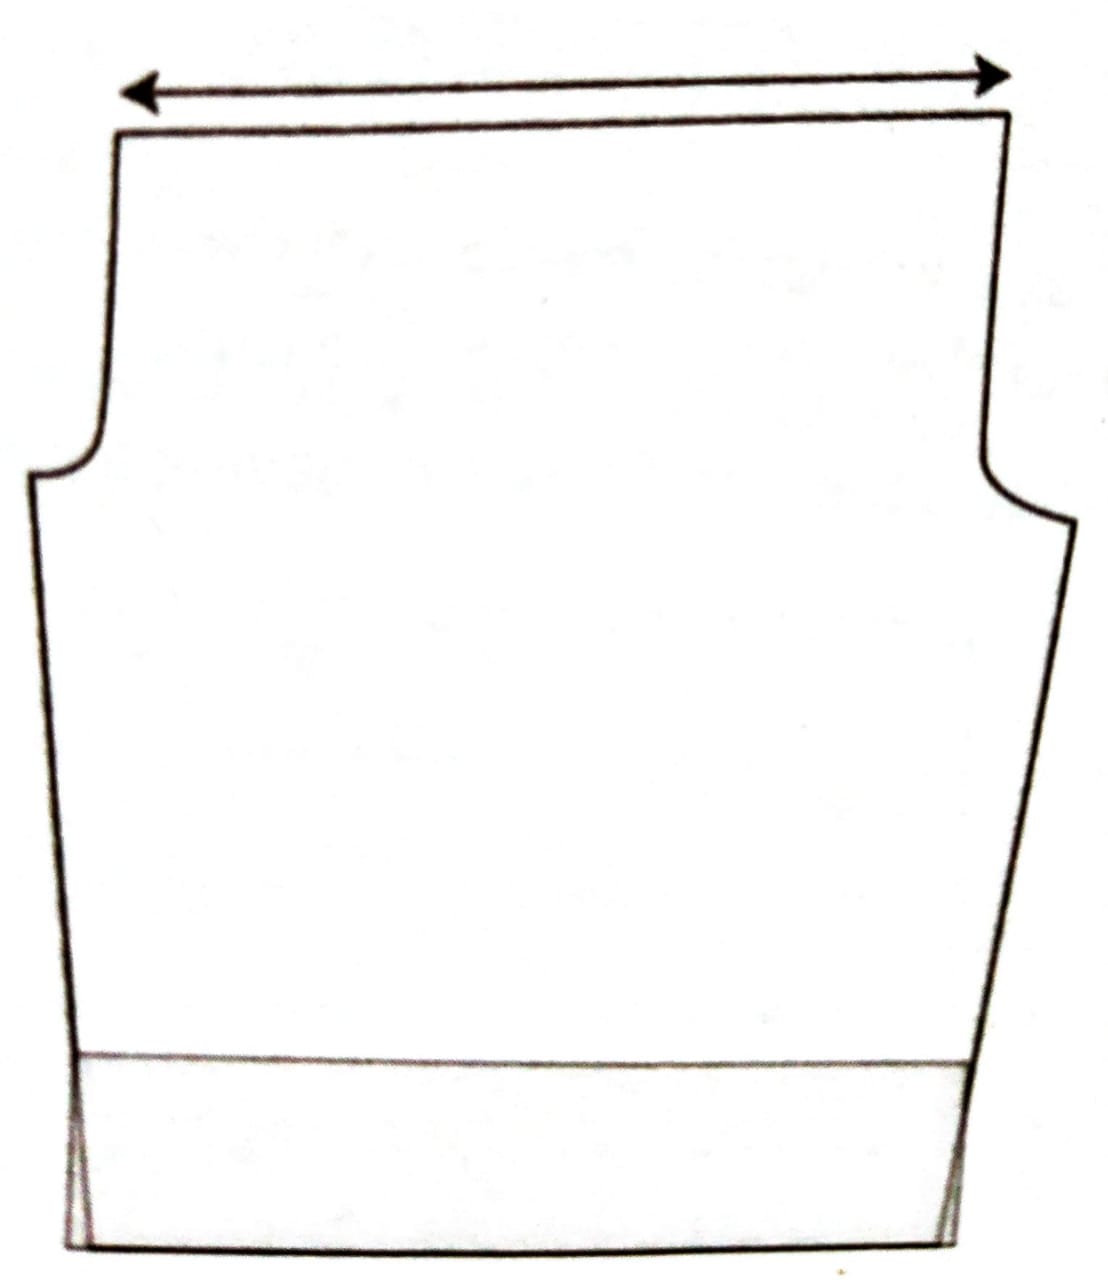
Basic Pattern For Sari Blouse
(With Waist Line Darts)
Back Bodice
7.Draw desired back neckline. This is usually kept deeper than that in the front.
8. Cut along the highlighted outline as shown
Fastening
Fastening can be given in the centre front or in the centre back Add 1 cm seam allowance for the attachment of hook and eye fastening strips
Significance of Having A Basic Bodice Pattern
This is the basic most pattern for sari blouse exclusive of waist bands and extra darts. Assembling is simple for the apprentices.
Any style variation in the neckline can be tried on this pattern For high necks, a shoulder slope is given is the basic most pattern for the apprentices.
This pattern helps as a base for all the types of princess lines. For details on princess lines, click here Just eliminate the darts without a need to press the design as given here
Easy to increase length.
Back or front clasp styles are easily modified. This pattern is without the seam allowance for fastening. 1 cm seam allowance is to be added at the centre (front or back) to give an opening .
Drafting and Cutting of Kurta/Kameez
Kurta and/or Kameez are traditional costumes of India. It is used along with Salwar, Churidar or denim pants The Collar or the neckline can be shaped according to style This garment is cut into three pieces, the front, back and sleeve. Darts are used to give fit or shape to the garment. The creation of Kameez may look long but it is very easy, just follow the instructions and you will end up with your own Kameez top
The construction of Kameez may look long but it is very easy, just follow the instructions and you will end up with your own Kameez top.
Measurement
.Square Neck : 14 Inches
Across Shoulder : 14 inches
Chest : 36 inches
Waist : 28 inches
. Hip: 38 inches
. Length of Top : 25 inches
Material Required:
1% Mtrs of fabric
Construction-Front
(0-1) = Kameez length (desired length)
(0-2) =Armhole depth = % chest-1″(for Medium figure) or 2″(for heavier figure)
(2-3) = Chest line = % chest 1″ (for Tight fit) or 2″ (for loose fit)
(5-6) = Shoulder drop- 1cm
(0-5) & (2-6)=% shoulder
(0-7) = Neck width
(0-9) = Front neck depth.
X is mid point of 6-6. (xx) = 1cm
Shape (6-x-3) front armhole curve.
Measure 6-x 3 it should be more than armhole by 3 to 4cms.
(0-10) = waist length
(10-11)% waist 1″ or 2″ (same as chest line)
(0-12) = Hip length
(12-13) Hip line = % hip+2″
(1-4) same as hip line
1″ up for shaping
(4-4) = 1’ up for shaping Join (1-4′) hem line

(4’- 13) Slit opening (Slit should not cross the Hip line)
Cutting line:
9-7-6-x-3-11-13-4′-1 (9-1) on fold
Construction – Back
(0-1)= Kameez length
(0-2) = Armhole depth = % chest – 1″(for Medium figure) or 2″(for heavier figure)
(2-3) = Chest line = % chest + 1″ (for Tight fit) or 2″ (for loose fit)
(5-6)= Shoulder drop = 1cm
(0-5) & (2-6′) = ½ shoulder
(0-7) = Neck width
(0-8)= Back neck depth
(8-8’) = Back slit opening = 1/6 chest + 1″
X is mid point of 6-6′
Shape (6-x-3) front armhole curve.
Measure 6-x-3 it should be more than ½ armhole by 3 to 4cms.
(10-11)=% waist + 1″ or 2″ (same as chest line)
(0-12) Hip length
(12-13) Hip line = % hip+2″
(1-4) = same as hip line
(4-4) = 1″ up for shaping Join (1-4′) hem line
(4′ 13) = Slit opening (Slit should not cross the Hip line)
Cutting line :
8-7-6-x-3-11-13-4′ 1 (8-1) on fold
Cut 8-8 on fold for back neck slit opening (Neck slit opening need only at the circumference of head is lesser than
neck circumference)
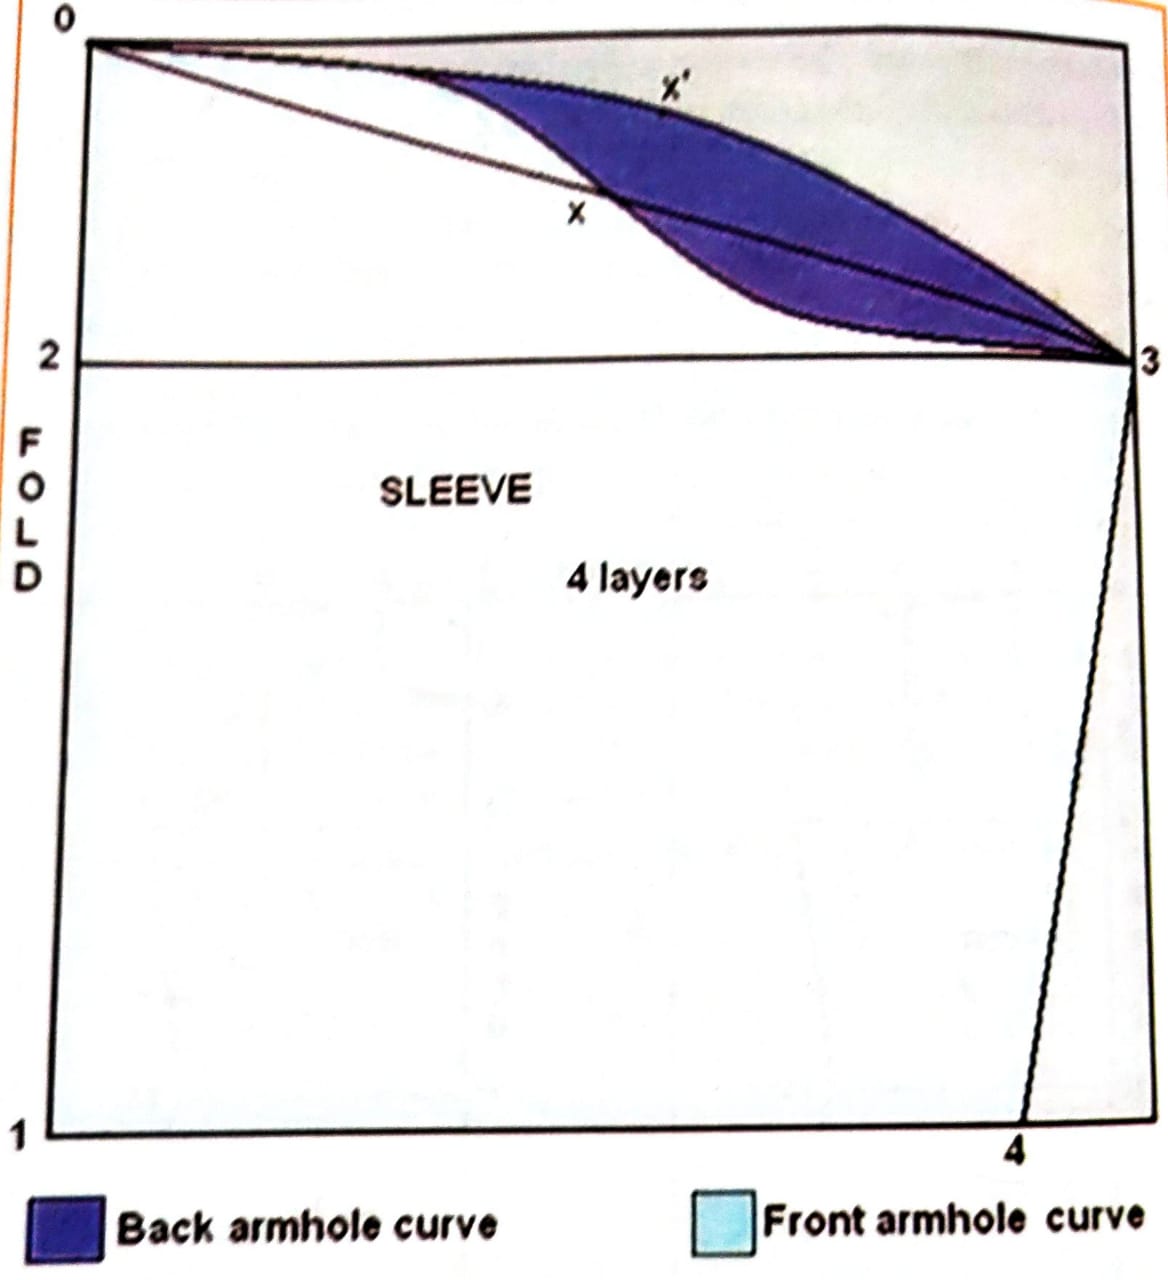
Construction: Sleeve:
(0-1) = Sleeve length
(0-2) = 1/8 chest-1½”
(2-3) = ¼ Chest ¾”
(1-4) = ½round arm
Join (3-4) under arm seam
X is the mid point of (0-3)
Take (x-x’) = 2 to 2.5cms up
Shape 0-x-3 front armhole curve
Shape 0-x-3 front armhole curve
Cutting line:
1-4-3-x-0 then cut through the first 2 layers 0-x-3
Seam Allowance:
1/4″ on neck line, armhole and back neck slit open
1″ on side seams
1%½” on hemlines
Drafting and Cutting of Pant
To draft your pants, you’ll need to do a little math. First, take your child’s hip measurement and divide it by 2 Then add 9 inches. Call this number A. Next, add the rise plus the inseam Call this number B. Draw a rectangle that is A wide by B tall.
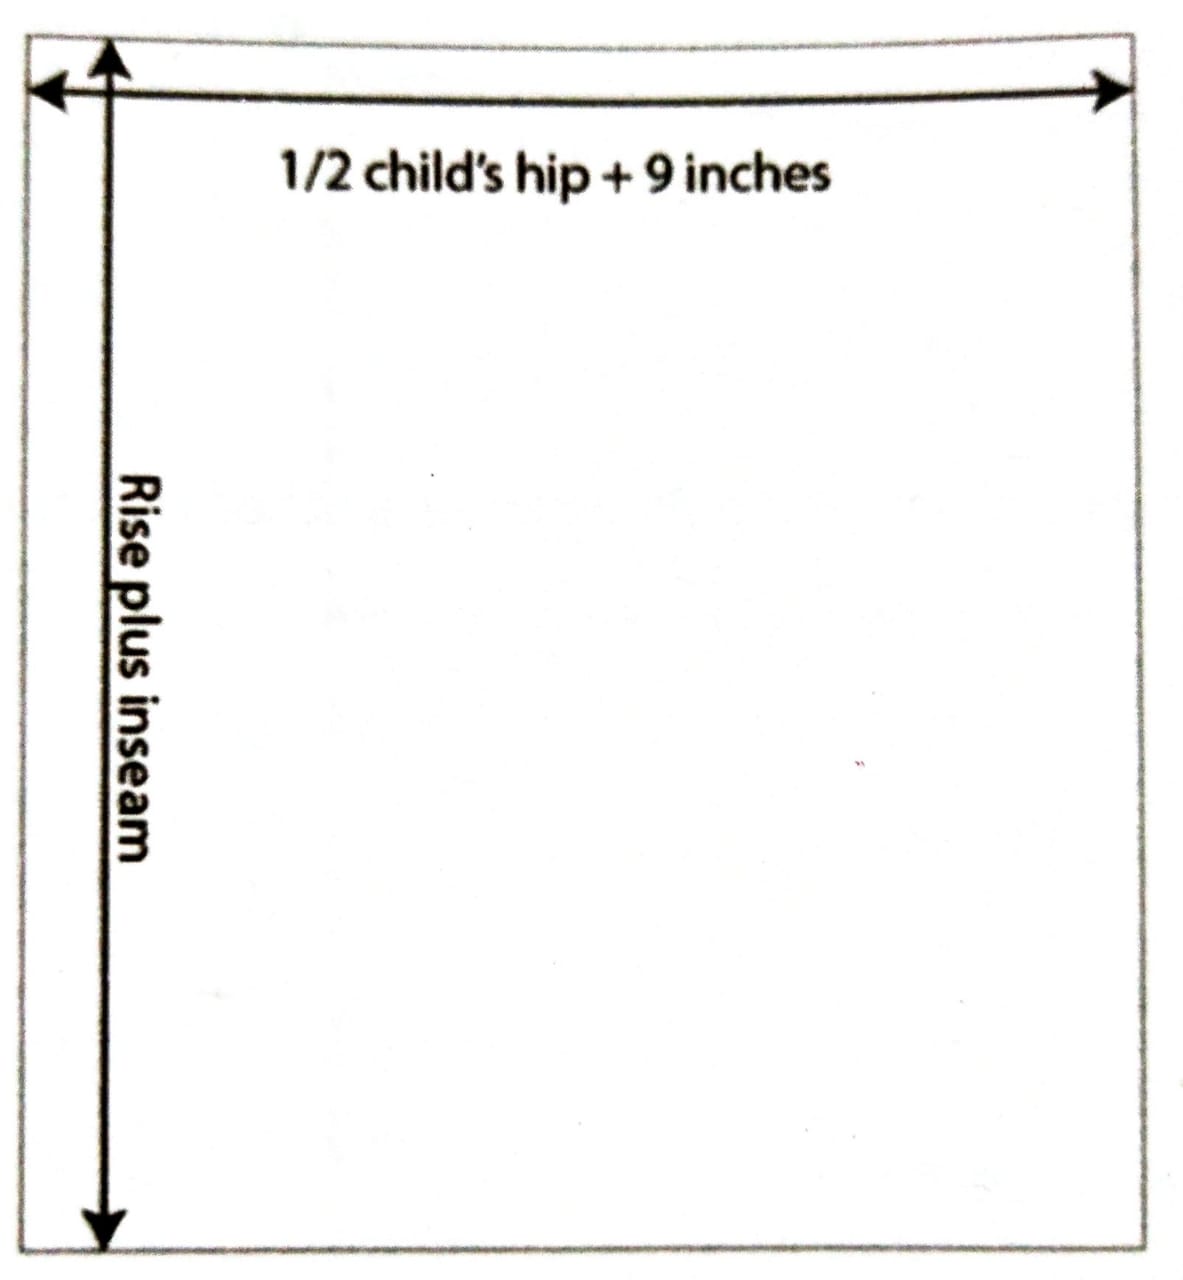
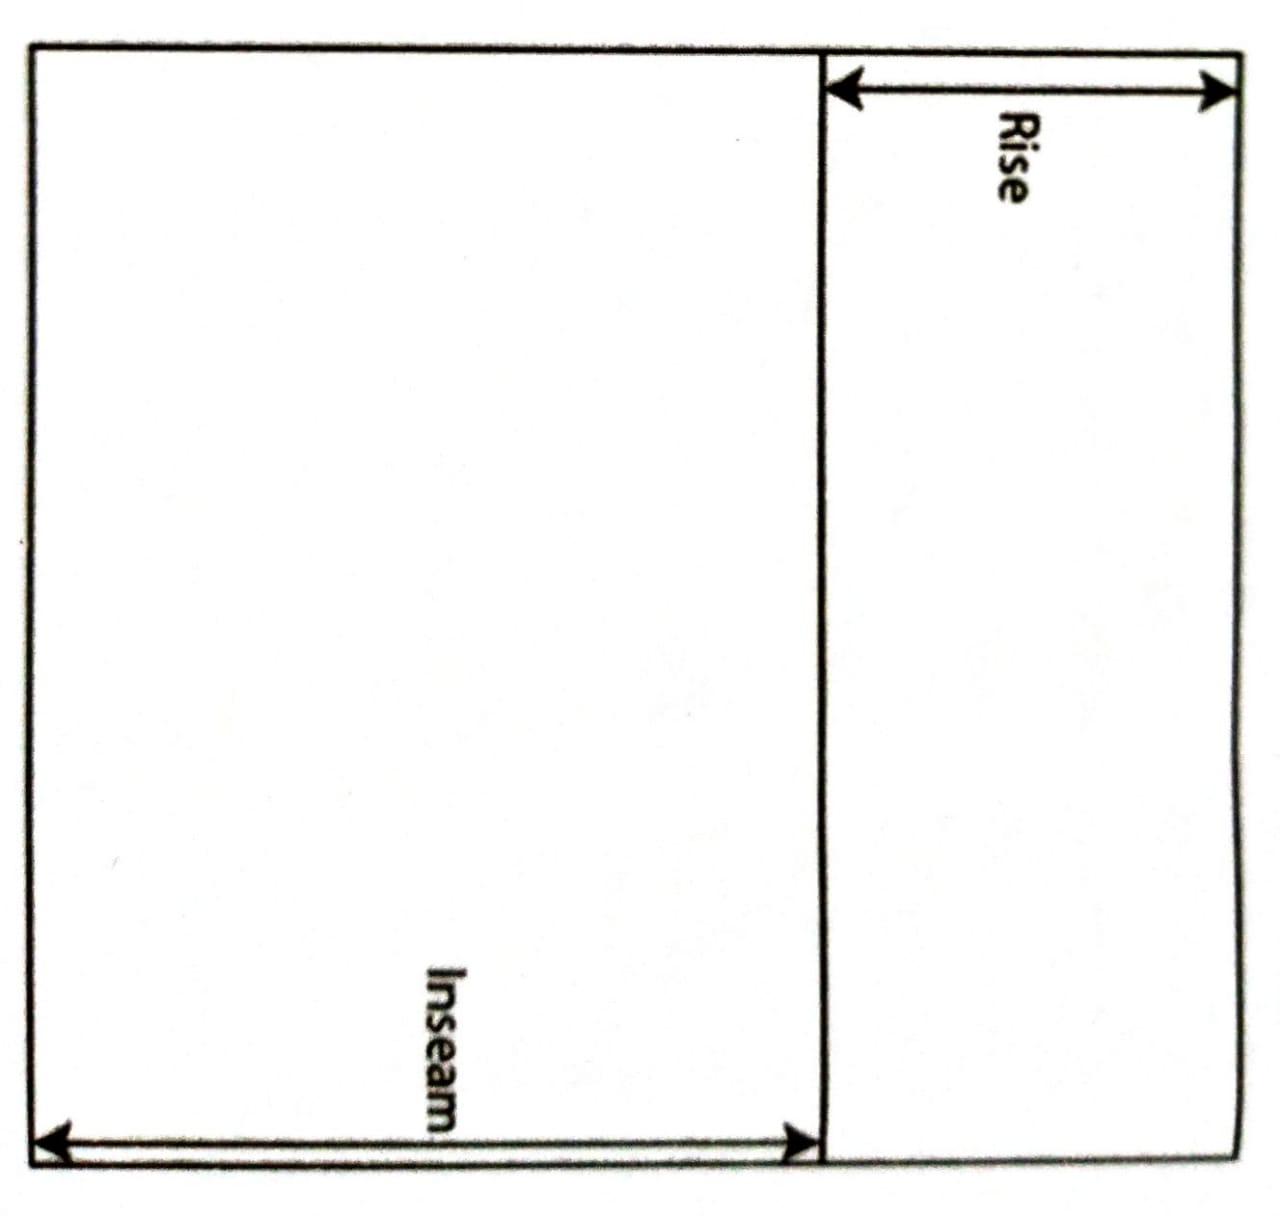
Draw a line across the rectangle between the inseam and rise lengths. Bring the sides of the rectangle in as shown at the rise line. The 1″ side is the front of the pants, the 2″ side is the back.
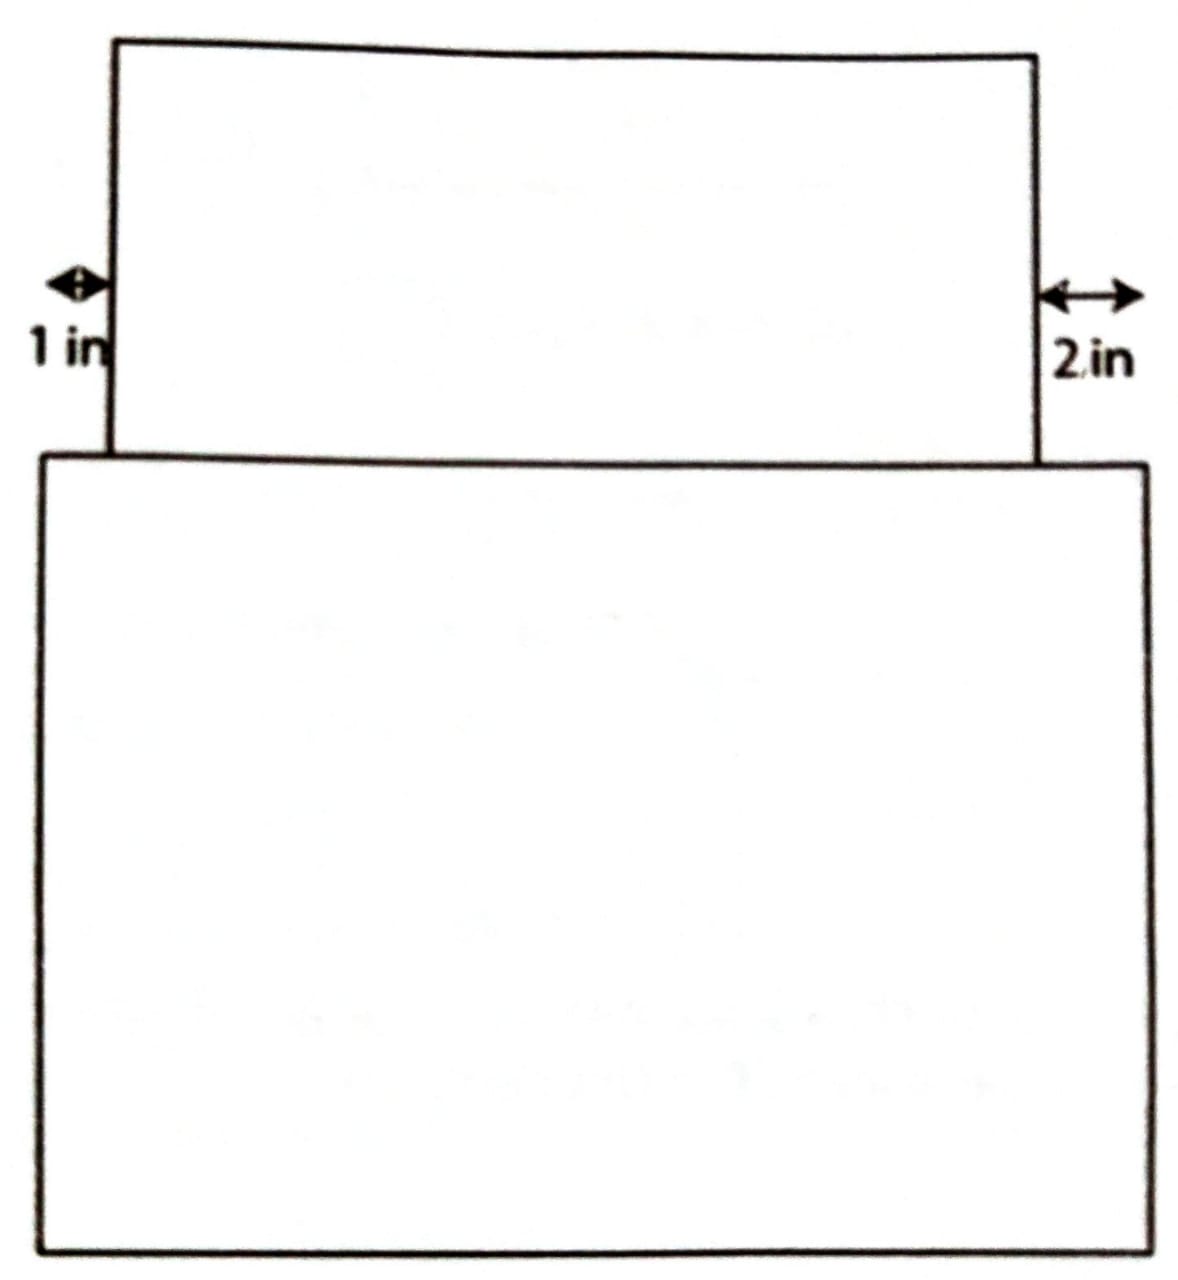
Curve the corners to create the crotch lines. At the front edge, drop the line 2 inches and redraw it – this way the waist will cover your kid’s booty but not come up uncomfortably high in the front.

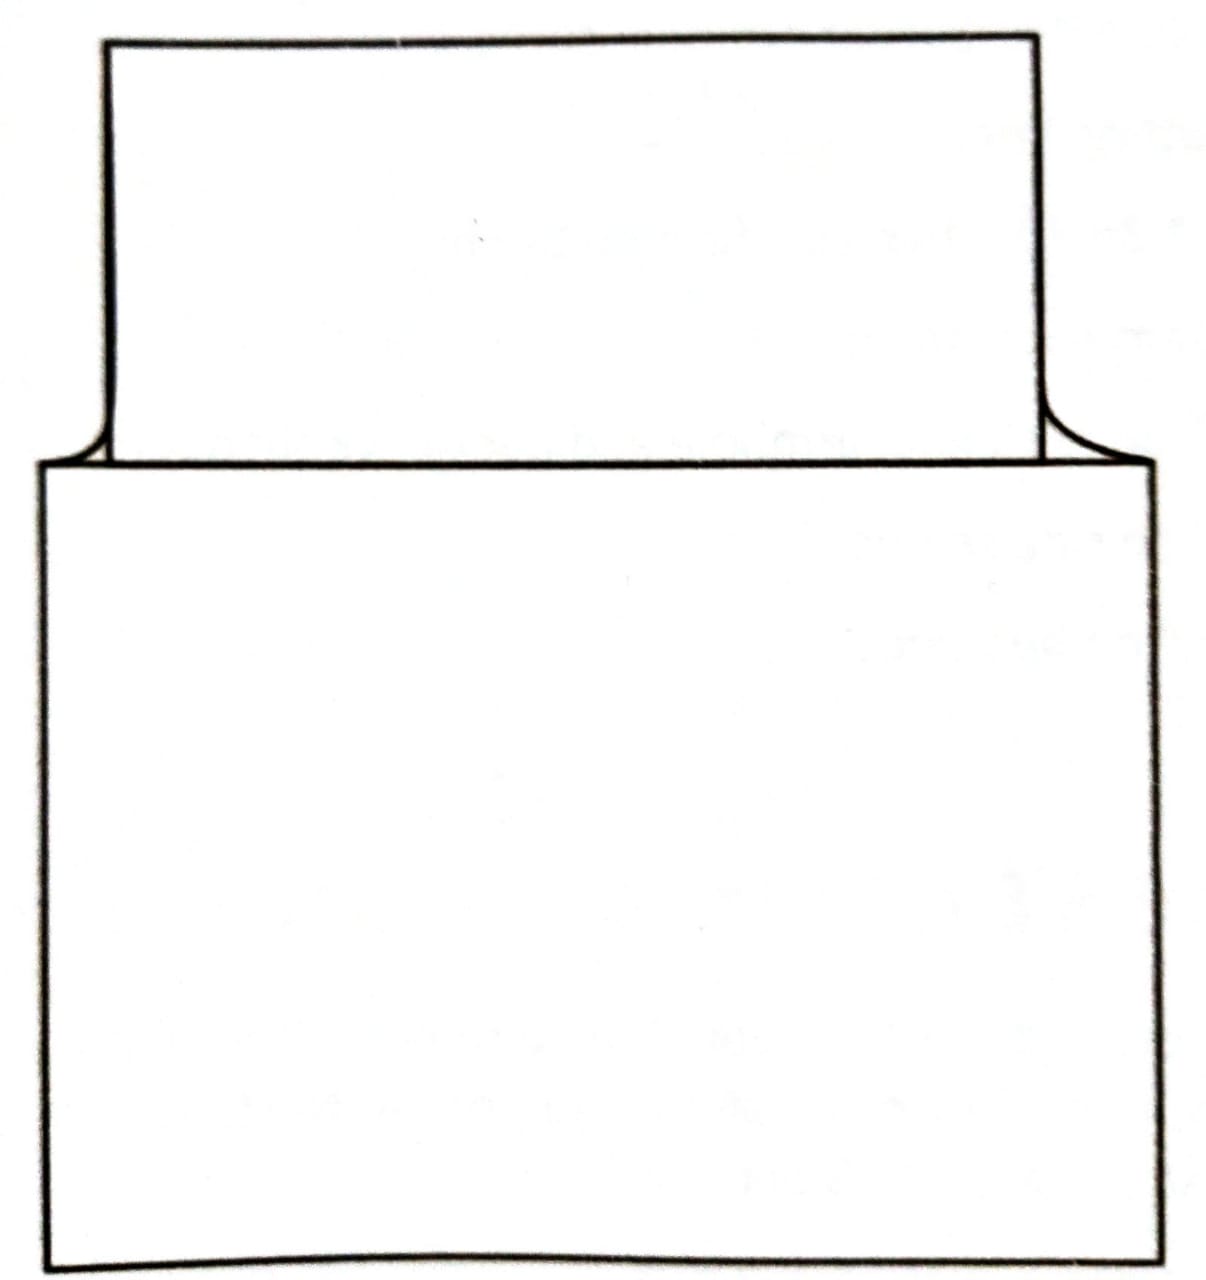
Bring the bottom corners of each pants leg in 1 1/2″. Measure the waistline – you’ll need that measurement to create the waistband.
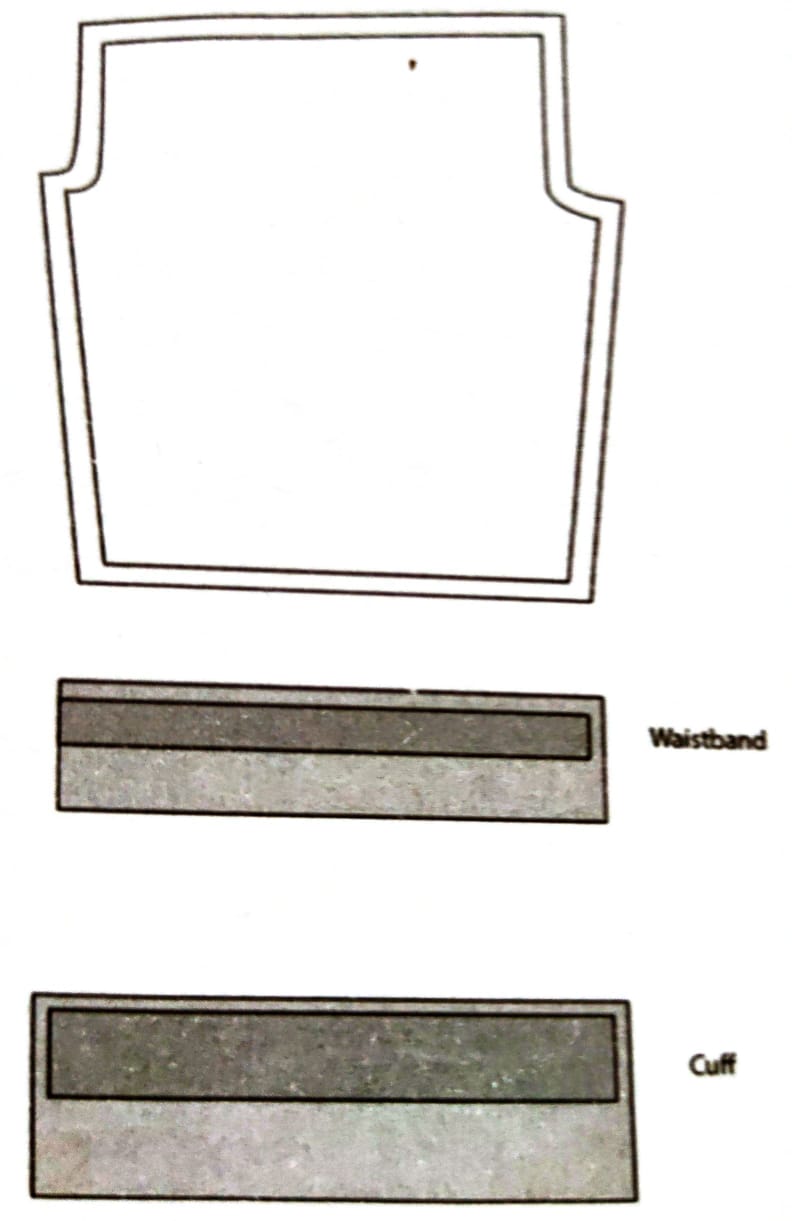
If you want cuffs, trace out a rectangle that covers the part of the pants you want to be the cuff. Don’t follow the angle of the pants leg at the bottom; keep your rectangle with 90 degree corners. Cut off your pants pattern at this line, separating the pants and the cuff. Add seam allowances all around the pants piece.
The waistband will be cut on the fold, so add a seam allowance to the top and side edge, then double this rectangle in height for the final waistband piece (because it will be folded in half to form the casing).
Industry Visit
The purpose of visiting a tailor shop/boutique is to get hands on knowledge about various processes involved in work of a tailor. During the visit you have to interact with Tailors and owner of the shop to understand how done in a tailor shop/boutique Make sure that you keep a notebook handy and note down any important The points that come up during your interaction at the tailor shop/boutique When you go to an tailor shop/boutique you should:
Understand drafting and cutting
Gather the information about the material equipment and measurement required for drafting and cutting.
Analyse how a tailor do drafting and cutting of long sleeve shirt, saree blouse, kurta/kameez and pant
Ask questions to Tailors/shop owners if you have any query