Cutting and Stiching of Kurti
In the realm of fashion and traditional attire, the kurti holds a special place for its versatility and cultural significance. Kurtis are worn by women across various occasions and are known for their comfort and elegance. Learning the art of cutting and stitching a kurti involves understanding basic sewing techniques, measurements, and fabric manipulation. This class note aims to provide a comprehensive guide to the process of cutting and stitching a kurti, suitable for beginners and enthusiasts alike.

Materials Required
Before diving into the process, it’s essential to gather the necessary materials:
- Fabric: Choose a fabric suitable for kurtis such as cotton, silk, georgette, or crepe, depending on the desired look and comfort.
- Pattern: A kurti pattern or measurements to draft one.
- Measuring Tools: Such as measuring tape, ruler, and marking tools like chalk or fabric marker.
- Cutting Tools: Scissors, pins, and a tracing wheel if using patterns.
- Sewing Supplies: Matching thread, sewing machine (or needle and hand-sewing supplies), iron, and interfacing (if needed for collar or cuffs).
- Embellishments (optional): Buttons, zippers, laces, etc., depending on the design.
Steps for Cutting and Stitching a Kurti
1. Taking Measurements
- Body Measurements: Measure bust, waist, hips, shoulder width, kurti length, and sleeve length. These measurements will determine the size and fit of the kurti.
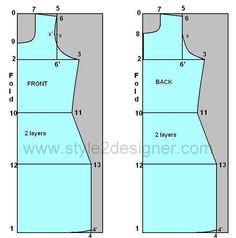
- Drafting the Pattern: Use standard measurements or a commercial pattern to draft the kurti pieces on paper or directly onto the fabric.
2. Cutting the Fabric
- Preparing the Fabric: Wash, dry, and iron the fabric before cutting to prevent shrinkage later.
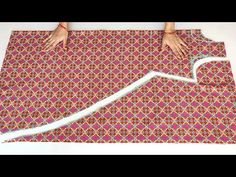
- Laying Out the Pattern: Pin or weigh down the pattern pieces on the fabric according to the grain line (parallel to the selvage).
- Cutting: Use sharp scissors to cut out the fabric pieces, ensuring precision along the edges.
3. Stitching Process
- Preparing the Pieces: Iron interfacing on collar or cuffs if necessary.
- Assembling the Pieces: Pin and stitch the shoulder seams, side seams, and sleeve seams (if separate sleeves).
- Neckline and Hemming: Finish the neckline with facing or bias tape. Hem the bottom of the kurti and sleeves.
- Adding Embellishments: Attach buttons, zippers, or lace as per the design.
4. Finishing Touches
- Pressing: Iron the completed kurti to set the seams and give it a crisp finish.
- Fit and Adjustments: Try on the kurti to check the fit. Make any necessary adjustments for length or fit.
- Final Inspection: Trim loose threads and ensure all seams are securely stitched.
5. Variations and Customizations
- Different Necklines: Experiment with round neck, V-neck, boat neck, or collar variations.
- Sleeve Styles: Try different sleeve lengths and styles like cap sleeves, three-quarter sleeves, or full sleeves.
- Embroidery and Embellishments: Add embroidery, sequins, or patchwork to personalize the kurti.
6. Troubleshooting Tips
- Seam Ripper: Use a seam ripper to undo stitches if there are mistakes or adjustments needed.
- Fitting Issues: Address fitting issues by altering seams or adjusting darts.
Conclusion
Mastering the art of cutting and stitching a kurti requires practice and attention to detail. Each step contributes to the overall look and comfort of the garment. With the right materials, measurements, and techniques, anyone can create a beautiful kurti tailored to their style and preferences. Whether for personal use or as a skill for potential entrepreneurship, this process opens doors to creativity and craftsmanship in the realm of fashion design.
