How to Make Clothing
There are many reasons why you may want to make clothing. If you are interested in fashion design, have some garments in mind that you’d like to make for yourself or simply need to make some alterations to clothing you already own, then it would be beneficial to know how to sew a garment from scratch. You do not need to be a seamstress to learn how to create your own custom apparel.
Sewing Preparation
1Learn the different tools you’ll need. Making clothes requires a bunch of different tools for sewing, for making patterns, and for measuring the patterns to make sure that they will fit you. You will need to learn each type of tool and how to use it. In the beginning you won’t be comfortable with all the tools, but the more you practice, the easier it will become.
Iron and ironing board. It’s fine to use whatever quality iron you already have, but you’ll probably want to eventually invest in a higher quality one. You’ll be using the iron to press the item being sewn as you are sewing as this makes sure the seams stay open properly.
Seam ripper. You’ll use this when you’ve made a mistake to rip out the wrong stitches.
Chalk for marking the fabric so you know where to sew and where to cut.
You’ll need a really nice, sharp pair of scissors that you designate for cutting cloth only, otherwise the scissors will dull more quickly and can damage or fray your fabric.
Tracing paper for drafting your patterns and modifying the patterns as you’re sewing.
Rulers for drafting and measuring while you’re constructing your piece (both in the design stages and the sewing stages).
Tape measuring, especially a flexible tape measure. You’ll use this to take measurements and make fit adjustments if you need them.
Pins for holding the fabric in position before you start sewing. Pins should be used only sparingly as they can distort the fabric that you’re working with.
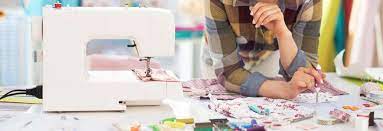
2.Acquire a sewing machine. There are basically two types of sewing machines, ones that fall into the household/domestic category and ones that fall into the industrial use category. There are pros and cons to both of these categories so it will take a little deciding to figure out which will work best for your needs.[1]
sewing machines tend to be more portable and more versatile. They tend to do a variety of stitch types. However, they don’t work out as well in terms of speed and power, and they aren’t very good with heavy fabrics.
Industrial sewing machines are much more powerful and much faster, but they tend to only be able to do one type of stitch (such as a straight lockstitch). They do that one stitch very well, but aren’t terribly versatile. They also tend to take up a lot more room.
If you want to sew stretchy materials, make sure your machine can do a zigzag stitch. Some machines have a specific stretch pitch, which is also helpful.
3.Learn the parts of your sewing machine. Hopefully your sewing machine will come with an instruction manual, because that will tell you which direction the bobbin is going to spin and where the bobbin case is. However, you’re going to need to know at least the basic components of your sewing machine before you can make fun things.
The spool holder holds the spool of thread and controls the direction of the thread while it goes through the sewing machine. Depending on the type of machine you have, your spool holder might be horizontal or it might be vertical.
Bobbin is basically a spindle that is wound with thread. You have to wind the bobbin with thread and fit it into the bobbin case (which is found under the needle plate).
Your sewing machine also has different stitch adjustments to help determine stitch length for each stitch, the amount of tension needed to make sure the stitches come through properly, and the different types of stitches (if you have the type of sewing machine that does different stitch types).
The take up lever controls the thread tension. If the thread tension isn’t at its proper level the threads will knot up, jamming the sewing machine.
You can check with a nearby sewing shop to see if they have any classes or know anyone willing to help you get set up with your sewing machine, or you can ask a knowledgeable family member or friend.
4.Start simple. When you’re just beginning with making clothes you’ll want to start out with simple designs, otherwise it’s easy to get frustrated and quit. It’s best to start with skirts, because these are easier to make than say a 3-piece suit and they require you to take fewer measurements.
When you’re first starting, try to avoid making clothes with buttons or zippers, like jackets. Do aprons or pajamas with elastic bands. Once you’ve gotten the hang of your tools and your sewing machine, then you can start advancing.
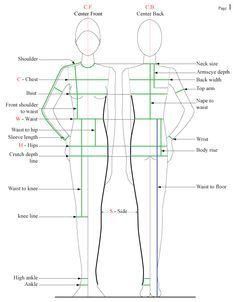
5. Make test garments. The best way to make your final piece the best it can possibly be is to make test clothes beforehand so you can tweak your design and make any changes to the final piece as you see fit. It’s recommended to use scraps from the same fabric as the final piece. 6.Take the appropriate measurements needed to make a pattern. Even if you’re making clothing from a pattern that you found somewhere, instead of creating one yourself, you’re still going to need to take your measurements so that the clothes will fit you when you’re finished.
For trousers, you will need the following measurements: waist, hip, crotch depth and full leg length from waist to floor. For shorts, use the trouser measurements you have, only shortening the pant length to the desired length.
For shirts, you will need the following measurements: neck, chest, shoulder width, arm length, armhole length and shirt length. Remember to take the measurements with a finger between the measuring tape and the body, so the shirt is snug, but not tight.
For skirts, you simply need waist and hip measurements. The length and fullness of the skirt will vary depending on what type of skirt you want to make.
Pattern Selection
1. Make a pattern. Sketch a pattern for your garment using the measurements you took. Use a similar garment as a guide for the appropriate pattern design and layout. There are lots of good places you can find pattern ideas.
Second hand stores and sewing shops often have fun vintage patterns (especially for dresses) and there are lots of easy patterns to be found online.
2. Lay your chosen fabric out on a large, flat surface and place the pattern pieces on the fabric. Deciding how to lay your pattern pieces out will take some careful planning.
Fold the fabric, right sides facing together, matching selvage to selvage. The selvage is the finished edges of the fabric that keep it from unraveling. Folding it like this will provide for easy cutting of double pattern pieces (sleeves, legs, etc.) and large symmetrical pattern pieces.
If you have large pattern pieces that are symmetrical and can be folded down the middle (shirt back, for instance), then fold the pattern piece down the center and pin the folded part of the pattern on the folded edge of the fabric. This saves cutting effort and ensures the cut fabric piece is perfectly symmetrical.
To make clothing that hugs the body, it is best to lay pattern pieces on the bias (at a 45 degree angle to the folded edge).
To sew a garment that has no stretch, place the pattern pieces at a 90 degree angle to the folded edge.
3.Iron any wrinkles out of your fabric. You have to make sure that your fabric is wrinkle-free otherwise it can screw up your final piece, if the wrinkles make the fabric come out of alignment.
4.Pin pattern pieces to the fabric. This will tell you where to cut. Make sure that it is still wrinkle-free and that the pattern pieces and the fabric are aligned properly.
5.Cut fabric according to pattern. Be sure to cut through both layers of fabric.
6.Remove paper pattern from fabric pattern pieces. You’re ready to get started with the sewing process.
Part -3
Sewing Tips
1.Pin the fabric pieces together along the seam edges. Determine which edges you must seam together and pin the 2 fabric pieces together, right sides facing together, at the seam edges. Insert the pins at a 90 degree angle from the edge so you don’t have to remove them as you sew a garment.
2. Sew the fabric pieces together, 1 edge at a time and from 1 end to the other, until you have a completely constructed garment.
This will take time, so try to be patient as you work. If you mess up at all, don’t worry, that’s what your seam ripper is for.
3.Use your sewing machine properly. You need to make sure that you have the correct needle for the task and the correct thread. Different types of thread and different types of needles work best with different types of fabric.
You’ll need different techniques for animal fiber fabrics like silk or wool or alpaca, as opposed to natural fibers like cotton or flax and synthetic fibers like rayon or polyester. Make sure that you know the type of fabric you’re using and what type of needle and thread will work best with it.
Gently guide the fabric through the machine. Don’t push or pull your project, because the machine is supposed to do that itself and you can clog the sewing machine or ruin your garment.
4.Hem the edges of your garment. Make clothing complete with clean, finished edges.
Fold the edge up, wrong side facing in, to the desired width of the hem and press the fold together. Fold the pressed edge up 1 more time and press again. Now, Sew along the top folded edge of the hem, inside of the garment.
5 Attach the finishing touches. This could be anything from buttons, elastic, zippers to various fun embroidery or special stitches. The better you get at sewing and making your own clothes the more creative you can get with adding those finishing touches.
Part -4


