Types of Seams
11.Faced seam
A faced seam is usually used in the seams of armholes, necklines and waistlines. It creates a very good finish to the seam line
How to sew a faced seam
Make a facing for the seam
sew it to the seam line
grade the seam allowance to half its width.
Press the seam allowance to the facing side
Under stitch the seam allowance to the facing close to the seam line
This under stitching prevents the seam from rolling to the outside of the garment
Checkout the tutorial for best ways to make facings.
12.Hemmed fell seam
How to sew a hemmed fell seam
Make a plain seam. One seam side is trimmed to half of the other side. The other seam is turned down and hemmed by hand.
13.Mock French seam (1)
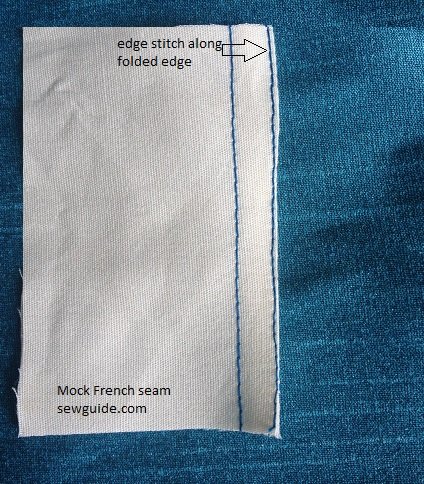
This is a seam which can be used in place of french seam where a french seam may not be possible like in a curved seam line, for eg. armholes of a transparent dress. This will neatly finish the seam line also.
How to sew mock french seam.
Unlike the french seam, here a plain seam with right side together is made first.
Place the fabrics right sides together. Stitch a plain seam along the stitching line.
Press the seam open and then close.
Turn in the edge of the seam allowance of each seam 1/4 inch. Press.
Edge Stitch along the this folded edge, so that the raw edge is enclosed inside.
14.Mock French seam (3)
This is another copy of the french seam – similar looking but done differently.
This seam also can be used in place of french seam and is very useful for sewing thin delicate fabrics and for loosely woven fabrics that frays a lot.
To sew this seam make a plain seam as usual. After this trim one of the seam allowances to half.
Turn the other seam allowance over the trimmed seam allowance and stitch in place. Use a small zig zag stitch for this.
Your new stitching line will be just outside of the seam line.
15.Serged seam
You need a Serger or Overlock machine for this seam. In this seam instead of a plain straight stitch the serger stitch is used on the seams and the seam allowance is trimmed by the machine.This seam gives stretch and flexibility to the seam.
This seam can be used under the following conditions
1.If it is not important that seams are kept flat or open.
2.For loose garments
3.On lightweight fabrics
4.When sewing with knits
How to sew a Serged seam
Place right sides of the fabrics together matching the stitching lines.
Keep the fabric under the needle
The serger will automatically trim the seam allowance and enclose the fabric edges in a thread.
A 3 thread serged seam will give stretch to the seam and a 4 thread serged seam will give strength to the seam. A 3 thread serged seam is usually used for knit fabrics for its stretching property.
16.Slot Seam
This seam which is similar to the lapped seam, is used for its functional as well as decorative properties.
How to sew a slot seam
Keep a 1 1/2″ wide cloth, as long as the seam, under the seams. This is used as a backing piece kept between the two fabric lapped along the stitching line.
17. Counter seam
A very suitable seam for heavy materials, in this both the raw edges are enclosed by both the seam allowances along the seam line
How to sew a counter seam
Turn under the seam allowances of both the fabric pieces to the wrong side. Press
Place the wrong side of the first piece of fabric on the right side of the second piece along the edges, keeping the seam allowances. Pin in place
Stitch along the folded edge.
18. Butt seams
The fabric edges are folded and joined together by a zig zag stitch or chain stitch. This is used when joining seams where you do not want any bulk. For example when sewing lingerie. You can make this kind of seam with the help of a sewing machine
19. Sheet seam/linen seam
This is a seam where we use an embroidery stitch to join the seams. It looks absolutely beautifully though not as strong as the other seams. The stitches can be set horizontally or slanting. Antwerp edging stitches, Fishbone stitch, blanket stitch or herringbone stitch can be used in this manner joining the seams. These stitches are called insertion stitches.
How to do this seam
- Finish the fabric edges
- Tack the edges of the two fabric ends with a buttonhole bar stitch
- Cut a strip of paper of 1 inch width and the length equal to the fabric edge
- Baste the edges of the fabric to the paper so that the distance between them is 1/2 inch
- Work the stitches between the fabric edges; Interlacing, knots, twisting all work between the edges For more details checkout the post – Insertion stitches
20. Hand stitched seam – with ladder stitch Ladder stitch is one of the invisible stitches that can give you a beautifully hand sewn seam.You can fold the edges and sew along the folded edge as in the picture given below. When you tighten the stitches you get a neat seam.Learn more about this stitch in this post on slip stitch or ladder stitch or in the post on invisible stitches
21. Strap seam In this seam an extra strip of fabric is attached on top of the seam line. The fabric strip is prepared by pressing the long edges 1/4 inches to the inside and then kept on top of the seam concealing the seam line and stitching along the edges.
22. Taped seam
This refers to any seam sealed with a tape for waterproofing/weather proofing. In this seam a strip of fabric/ tape is sewn to the seam to prevent water or any elements from seeping into the inside of the item. The tape may also be added to prevent distortion.
TYPES OF STITCHES – BEST STITCHES TO USE FOR SEWING
There are many types of stitches used for hand sewing and machine sewing. This handy guide with photographs will help you identify exactly which stitch you need for your latest project. If you are looking for the simplest sewing machine stitch, skip to the straight stitch and if you need a simple hand stitch then the easiest is the Type Of Stitces
Types of Stitches


