
Hotel Management Class Notes 18
Dust Mop

Preparation –
Set up a routine schedule for the dust mopping to be done, either nightly, weekly or monthly. This will largely depend on your unique situation and how much foot traffic you have tracking in dirt from the outside world. Once you have your routine in place and are ready to start dust mopping, you’ll need to look around and identify things that will impede your efficiency. Move any and all obstacles in the area that may be in your sweeping path. Remove all larger pieces of debris that the dust mop will not able to sweep away and throw them into a trash container.
Choosing Your Dust Mop –
You’ll want to choose the appropriate dust mop for your individual situation. We recommend using a dust mop that is approximately 1/2 to 1/3 the width of the area that needs dust mopping. For example, retail and grocery store aisles are typically 6 to 7 feet wide, so a 36″ dust mop would be perfect for this situation, because you can clean nearly half the aisle in one pass, yet still allow customers to pass by as you clean. Larger areas, like warehouse aisles would need something larger like a 60″ warehouse dust mop.
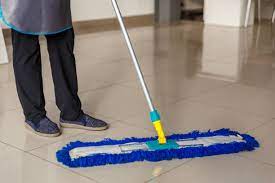
Dust Mopping Your Prepped Area –
Push your mop while holding the handle close to your stomach or chest. Get as close to the edges of the aisle as possible. Pull the mop head back frequently and shake out or drop against the ground to keep the dust/debris in front of the mop and not from loading up in the strands of the mop. When you reach the end of the aisle, make a large sweeping turn, keeping the debris in front of the mop and go back down the aisle overlapping the last path by about 6 or 8 inches. When dust mopping smaller areas, such as bathrooms or offices, use a smaller mop like our 24″ microfiber dust mop. Start dust mopping at the doorway and work the outer perimeter, pushing everything to the center of the room for later removal with a mop and dust pan.
Removal of Dirt & Debris –
Use something similar to our lobby dust pan and stiff yellow corn broom to sweep up all dirt, debris and trash. Empty the lobby dust pan into an acceptable trash container lined with a garbage bag.

Dust Mopping Your Prepped Area –
Take the dust mop outside and shake out like you would a rug to remove as much dirt and debris as possible. If after several shake outs all the dirt does not come out, you can either replace it, or if the mop is launder-able, place it into a microfiber cloth rags washing machine and wash it. Spraying the mop with dust mop treatment after it has been cleaned will help to prolong its life and keep it from streaking on hard floor surfaces.

Tips for Sweeping With Your Broom
- Avoid getting your broom wet. It damages the broom and shortens its lifespan.
- When washing a broom, make sure that it dries thoroughly upside down, to prevent bristles from being bent or damaged.
- Sweep as needed on a daily basis. There is no set schedule for sweeping.
How to Sweep a Floor
We’ve got all kinds of nifty gadgets that have tried to replace our brooms, but the truth is that every home still needs to have a classic broom. A broom is a great tool for a quick pickup or an intense floor cleaning. Find out how to make sweeping your floors a more effective and efficient way of cleaning your home. Although the time required will vary depending on the room and size of the floor, sweeping is a fairly easy task to take on. Luckily, you only need three items to get started: a broom, a dustpan, and a trash can.
How You Start Sweeping Floors Like a Pro
- Choose a Broom: Find a broom that fits with your floor type. Smoother floors can get by with synthetic brooms, while rougher floors may need natural fiber brooms to be just as effective. Choose a broom with an angled edge for cleaning under cabinets and in tight spaces and make sure your broom is at a comfortable height, and not too heavy to manage. While there are over 200+ types of brooms out there, you can find one of the 14 brooms recommended by The Sweethome researchers.
- Find a Starting Place: When sweeping a room, there are a couple of different methods to consider. Some people like to walk the perimeter of a room, sweeping from the edges into a pile in the center. Others prefer to begin at one end of the room and move to the other, pulling the dirt pile along with them, or eliminating the pile in sections. Choose a method and starting point that works best for you.
- Start Sweeping: Sweeping isn’t a difficult motion to master, but you want to try to keep continuous contact with the floor without pressing the broom strands down into the floor. Begin on a section of the floor that is away from your body and gently drag the broom toward your body. You can use short quick motions or long sweeping motions to get the job done. Choose a sweeping style that best fits your personal preference.
- Sweep Up Your Dirt Pile: Next, you want to sweep dirt into a pile. After all the dirt is in a pile, sweep the dirt pile into a dustpan and then deposit it in the trash. Be careful not to dump the dirt too quickly, as this may cause dust and dirt to billow back into your face, or onto your clean floor.
- Put Away Supplies: After you are done sweeping, put away all of your sweeping supplies and be sure to clean your broom as needed. Hang your broom to prevent the bristles from becoming bent or damaged, or sit the broom upside down for storage.