How to Use Microsoft Word
Getting Started
When you first open Microsoft Word, you’ll see a blank document ready for you to start typing. Here’s a brief overview of the main parts of the Word interface:
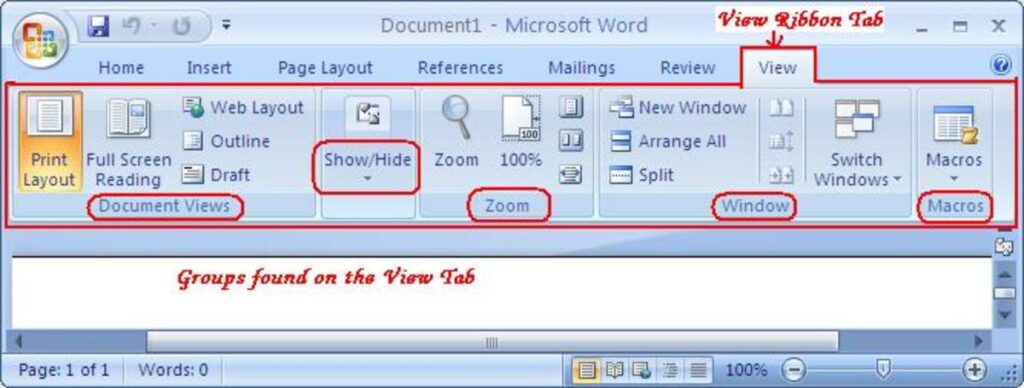
- Ribbon: The ribbon is the horizontal menu at the top of the Word window. It contains tabs, such as “Home,” “Insert,” “Design,” and “Layout,” each of which contains various commands and tools for working with your document.
- Document Area: This is the main area where you’ll type and edit your text. You can also insert images, tables, and other elements into your document here.
- Status Bar: The status bar at the bottom of the Word window displays information about your document, such as the page number, word count, and the current view.
- Quick Access Toolbar: This is a customizable toolbar that contains shortcuts to commonly used commands, such as Save, Undo, and Redo. You can customize this toolbar to add or remove commands as needed.
Creating a New Document

To create a new document in Word, follow these steps:
- Click on the “File” tab in the top left corner of the Word window.
- Select “New” from the menu.
- Choose a blank document or select a template from the available options.
Typing and Formatting Text
To type and format text in your document, follow these steps:
- Click anywhere in the document to place your cursor.
- Start typing to add text to the document.
- To format text, select the text you want to format, then use the options in the “Font” group on the “Home” tab. You can change the font, font size, font color, and apply bold, italic, or underline formatting.
Working with Paragraphs
Word allows you to control the formatting of paragraphs in your document. Here are some common tasks you can perform:
- Aligning Text: Use the alignment buttons in the “Paragraph” group on the “Home” tab to align text left, center, right, or justify (align both left and right edges).
- Line Spacing: Use the line spacing options in the “Paragraph” group to set single spacing, double spacing, or other custom spacing options.
- Paragraph Indentation: Use the indent buttons in the “Paragraph” group to indent the first line of a paragraph or the entire paragraph.
Inserting Images and Graphics
To insert images and other graphics into your document, follow these steps:
- Click on the “Insert” tab in the ribbon.
- Click on the “Pictures” button to insert an image from your computer, or select “Online Pictures” to search for and insert an image from the web.
- Once the image is inserted, you can resize and move it as needed by clicking and dragging the handles around the image.
Adding Page Numbers

To add page numbers to your document, follow these steps:
- Click on the “Insert” tab in the ribbon.
- Click on the “Page Number” button in the “Header & Footer” group.
- Select where you want the page numbers to appear in the document (e.g., top of page, bottom of page).
- Choose a format for the page numbers (e.g., 1, 2, 3; i, ii, iii).
- Word will automatically insert the page numbers into your document.
Spell Checking and Proofreading
Word includes a built-in spell checker and proofreading tools to help you catch and correct errors in your document. To run a spell check, follow these steps:
- Click on the “Review” tab in the ribbon.
- Click on the “Spelling & Grammar” button in the “Proofing” group.
- Word will check your document for spelling and grammar errors and provide suggestions for corrections.
Saving and Sharing Your Document
To save your document, follow these steps:
- Click on the “File” tab in the ribbon.
- Select “Save As” from the menu.
- Choose where you want to save the document (e.g., your computer, OneDrive, Dropbox).
- Enter a name for the document and click “Save.”
To share your document with others, you can:
- Click on the “File” tab.
- Select “Share” from the menu.
- Choose how you want to share the document (e.g., email, OneDrive, SharePoint).
Printing Your Document
To print your document, follow these steps:
- Click on the “File” tab in the ribbon.
- Select “Print” from the menu.
- Choose your printer and any printing options you need (e.g., number of copies, color or black and white).
- Click “Print” to print your document.
Advanced Features
Word includes many advanced features for creating professional-looking documents. Some of these features include:
- Styles: Use styles to quickly format your document with consistent fonts, colors, and spacing.
- Tables: Insert tables to organize and present data in your document.
- Headers and Footers: Add headers and footers to your document for page numbers, document titles, and other information.
- References: Use the “References” tab to add citations, a table of contents, footnotes, and endnotes to your document.
- Mail Merge: Use the mail merge feature to create personalized documents, such as form letters or envelopes, for multiple recipients.
Conclusion
Microsoft Word is a powerful tool for creating and formatting documents of all kinds. By familiarizing yourself with the basic features and functions of Word, you can quickly and easily create professional-looking documents for work, school, or personal use.
1)How to change the text font?
Go to Home Tab > Font > Font. Select the font.
2) SHORTKEY for opening a new document?
Ctrl + N
3) How to add Bold or italic to any text?
Select the text you want to change. Then, select the Bold, in the home tab.
4) How to underline any text?
Select the text you want to change. Underline button in the Home tab.
5) How to strikethrough any text?
Select the text you want to change. strikethrough button in the Home tab.
6) How to subscript any text?
Select the text you want to change. Subscript button in the Home tab.
7) How to change case of any sentence?
- Select the text for which you want to change the case.
- Go to Home > Change case .
- Do one of the following.
8) How to highlight text?
- Select the text that you want to highlight.
- Go to Home and select the arrow next to Text Highlight Color.
- Select the color that you want.
9) How to change font colour?
Select the text that you want to change. On the Home tab, in the Font group, choose the arrow next to Font Color, and then select a color.
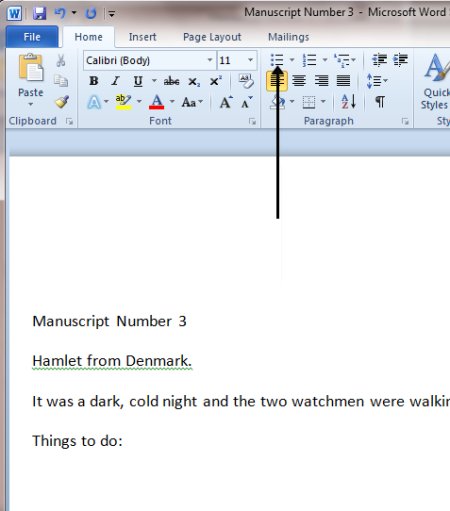
10) How to use bullets?
Place your cursor where you want a bulleted list.
Click Home> Paragraph, and then click the arrow next to Bullets. Choose a bullet style and start typing.
11) How to use numbering?
Place your curso How to use numbering?r where you want a numbering list.
Click Home> Paragraph, and then click the arrow next to numbering. Choose a numbering style and start typing.
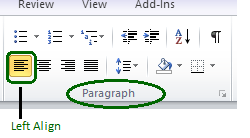
12) How to use left align text?

select the paragraph text which you want to make left-aligned. Go to “Home” tab and click on left align . The paragraph text is aligned to the left successfully.
13) How to use right align text?

select the paragraph text which you want to make Right-aligned. Go to “Home” tab and click on right align . The paragraph text is aligned to the right successfully.

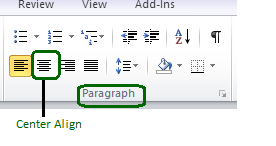
14) How to use center?

select the paragraph text which you want to make Center-aligned. Go to “Home” tab and click on Center align . The paragraph text is aligned to the Center successfully.
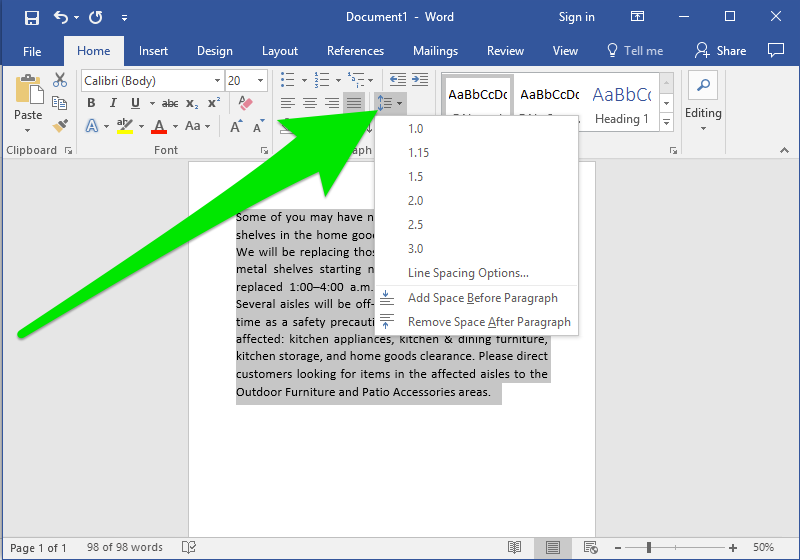
15) How to add line spacing?
Go to Home > Line and Paragraph Spacing. Select Line Spacing Options, and then choose the options you want under Spacing.
16) How to shade a text?
- Select the word or paragraph that you want to apply shading to.
- On the Home tab, in the Paragraph group, click the arrow next to Shading.
- Under Theme Colors, click the color that you want to use to shade your selection.