Computer Class Note 6
How to Purchasing a domain ?
Purchasing a domain is a straightforward process, and you can follow these steps to acquire your desired domain name:
- Choose a Domain Name: First, decide on the domain name you want. Make sure it’s relevant to your website’s purpose and is easy to remember.
- Check Domain Availability: Use a domain registrar’s search tool to check if your desired domain name is available. Many domain registrars offer search functions on their websites. Simply enter your chosen domain name to see if it’s already taken. If it’s unavailable, you may need to come up with an alternative or consider different domain extensions (e.g., .com, .net, .org).
- Select a Domain Registrar: Choose a reputable domain registrar. Some popular options include GoDaddy, Namecheap, Google Domains, and many others. Compare prices, features, and customer reviews to find the registrar that best fits your needs.
- Register Your Domain: a. Go to the website of your chosen domain registrar. b. Use their search tool to check if your domain name is available. c. If available, add it to your cart. d. Review your order and proceed to the checkout.
- Configure Your Domain: During the purchase process, you’ll need to configure your domain. This involves setting options like domain privacy (to protect your personal information), domain auto-renewal, and other settings.
- Provide Contact Information: You’ll be asked to provide accurate contact information. Ensure that this information is up to date, as it’s used for domain registration.
- Complete the Purchase: Enter your payment information and complete the purchase. Make sure to save or print a copy of your receipt for your records.
- Verify Your Email: You may receive an email from the domain registrar asking you to verify your contact information. Follow the instructions in this email to confirm your registration.
- Access Your Domain: Once the purchase is complete, you’ll have access to a control panel where you can manage your domain settings, including DNS (Domain Name System) settings, which allow you to link your domain to your website hosting provider.
- Point Your Domain: If you have a website hosted elsewhere, you’ll need to set the DNS records to point to your hosting provider’s servers. This step varies depending on your hosting provider, so follow their instructions.
It’s important to note that domain registration is typically an annual subscription, so you’ll need to renew it each year to maintain ownership of the domain. Most registrars offer automatic renewal options to avoid accidental expiration.
Lastly, keep track of your domain’s expiration date to ensure you renew it in a timely manner, so you don’t lose ownership of your domain name.
How to Buy Hosting ?

Buying web hosting is an essential step in establishing your online presence. Here’s how to purchase web hosting for your website:
- Choose a Web Hosting Provider:
- Research and compare different web hosting providers. Some popular options include Bluehost, HostGator, SiteGround, and InMotion Hosting. Consider factors like pricing, features, customer support, and user reviews to make an informed choice.
- Select a Hosting Plan:
- Hosting providers offer various hosting plans, including shared hosting, VPS hosting, dedicated hosting, and more. Choose a plan that suits your website’s needs and budget. Shared hosting is a cost-effective option for most small to medium-sized websites.
- Register or Transfer a Domain (if needed):
- If you haven’t already registered a domain, you can often do this through the hosting provider during the signup process. Some hosting plans include a free domain registration for the first year. If you already have a domain, you can either transfer it to your new hosting provider or update its DNS settings to point to the new hosting.
- Review Hosting Features:
- Before proceeding with the purchase, review the features of your chosen hosting plan. Ensure it includes the necessary resources (e.g., disk space, bandwidth, email accounts, databases, and support for the technologies your website requires).
- Customize and Order Your Plan:
- Add your chosen hosting plan to your cart. Some providers may offer optional add-ons, like domain privacy or backup services. Review your order and customize it as needed.
- Provide Contact and Billing Information:
- Fill out the required contact and billing information to complete the order. Ensure that your contact details are accurate, as this is important for account management and support.
- Choose a Billing Cycle:
- Most hosting providers offer various billing cycles, such as monthly, yearly, or longer terms. Choosing a longer-term plan often comes with discounts, but be sure you’re comfortable with the commitment.
- Enter Payment Information:
- Provide your payment information, which may include credit/debit card details, PayPal, or other payment methods accepted by the hosting provider.
- Review and Confirm Your Order:
- Carefully review your order, including the hosting plan, domain registration, add-ons, and total cost. Make sure everything is correct before confirming your purchase.
- Complete the Purchase:
- Click the “Complete Purchase” or similar button to finalize the order. You’ll receive a confirmation email with details about your hosting account.
- Access Your Hosting Control Panel:
- After your purchase is complete, you’ll receive login credentials for your hosting control panel (e.g., cPanel, Plesk). Here, you can manage your website files, databases, email accounts, and other settings.
- Upload Your Website:
- Use an FTP (File Transfer Protocol) client or a file manager in your hosting control panel to upload your website’s files and folders to your hosting server.
- Set Up Your Email (if applicable):
- If your hosting plan includes email services, you can create email accounts and configure email clients like Outlook or Thunderbird.
- Point Your Domain:
- If you registered your domain through the hosting provider, it should already be configured. If not, you may need to update your domain’s DNS settings to point to your hosting provider’s servers.
Now that you’ve purchased web hosting, you’re ready to build and launch your website. The specific steps and tools you use to build your website will depend on your chosen hosting provider and the website platform you prefer (e.g., WordPress, Joomla, Drupal, etc.).
How to Conect Domain And Hosting ?
Connecting your domain and hosting is a crucial step to ensure that your website is accessible on the internet. To do this, you’ll need to configure the domain’s DNS (Domain Name System) settings to point to your hosting provider’s servers. Here’s a step-by-step guide on how to connect your domain and hosting:
- Login to Your Domain Registrar Account:
- Go to the website of your domain registrar (the service where you registered your domain) and log in to your account.
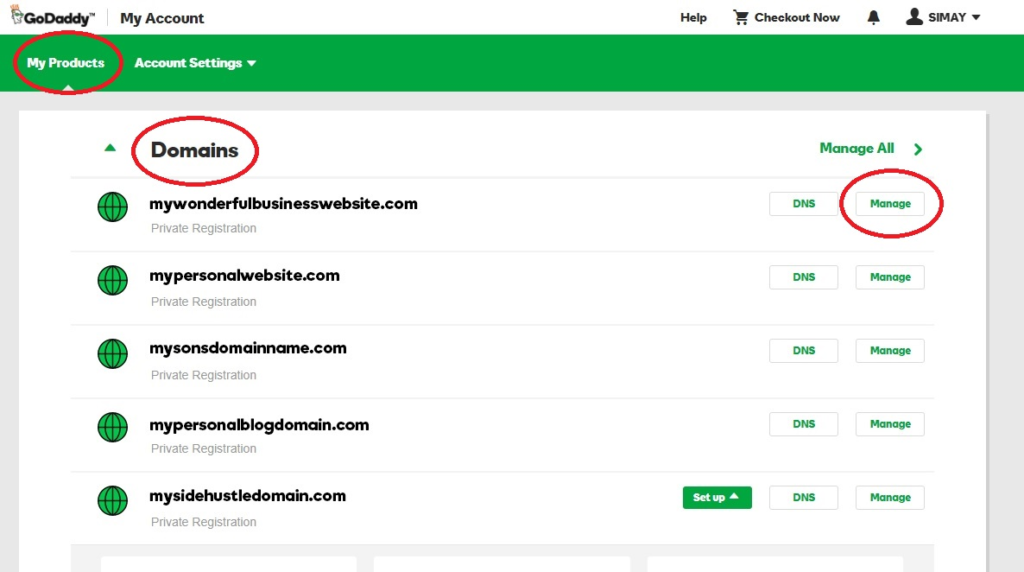
- Access Domain Management:
- Locate the section for managing your domains, often labeled as “Domain Management,” “My Domains,” or something similar.
- Select Your Domain:
- Choose the domain you want to connect to your hosting. If you have multiple domains, make sure you select the correct one.
- Find DNS Settings:
- Look for an option to manage DNS settings or DNS records for your domain. This section may be labeled as “DNS Management,” “DNS Zone Editor,” “Name Servers,” or something similar.
- Change Name Servers:
- You’ll typically see fields for Name Servers. Name Servers are the addresses of the servers where your website’s files are hosted. You need to replace the default Name Servers with the ones provided by your hosting provider.
- Obtain Hosting Name Servers:
- Your hosting provider will provide you with the specific Name Servers you need to use. These Name Servers are usually in the format of ns1.yourhostingprovider.com and ns2.yourhostingprovider.com. You can find this information in your hosting account or by contacting your hosting support.
- Update Name Servers:
- Enter the Name Server information provided by your hosting provider into the respective fields. You may need to add at least two Name Servers. Save the changes.
- Propagation Time:
- DNS changes may take some time to propagate throughout the internet. It can vary from a few minutes to 48 hours. During this period, some visitors might still see your old website, while others see the new one.
- Test Your Connection:
- After DNS propagation is complete, you can test your connection by entering your domain name in a web browser. If it’s correctly configured, your website hosted on your hosting server should load.
- Additional Settings (if needed):
- Depending on your hosting provider and the services you’re using, you might need to configure additional settings like email forwarding or subdomains. These settings can usually be managed through your hosting control panel.
Keep in mind that DNS changes are usually straightforward, but it’s essential to double-check the information to avoid any errors. If you encounter any issues or are unsure about making these changes, you can reach out to your hosting provider’s support or your domain registrar for assistance. They can guide you through the process or even make the changes for you.